It's our third annual holiday series.... The 12 Cakes of Christmas!! We're oohing and aahing over twelve marvelous cake designs, created especially for this series! All brand new, never seen before, and created by some of your favorite bakers! For our theme this year, we're taking a moment to reflect on our favorite Christmas memories and traditions. It's a feel good month, celebrating the little things that make this season shine bright. Each of our featured bakers was asked to create a ... Continue Reading
Search Results for: white
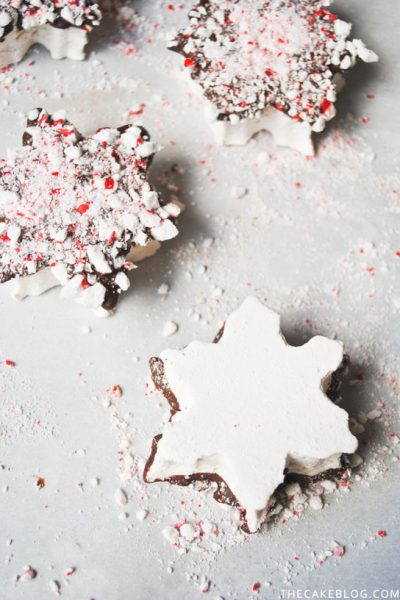
Recipe: Marshmallow Snowflakes
Happy Monday! It's December 16th and Christmas is less than 10 days away. I'm not sure why I felt the need to announce that... I know we all have calendars and can count. But for real! Christmas is less than 10 days away!! Today, we're jumping right back in to the holiday inspiration with a round up of creative projects that will have you ready for Christmas in no time flat. From cookies and candy to crafts and entertaining, we've got you covered. I've teamed up with a few of my friends ... Continue Reading
DIY: Sparkling Glitter Acorns
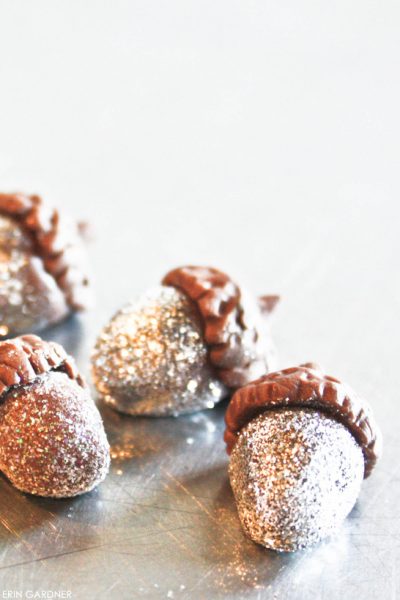
Our contributor, Erin Gardner of Wild Orchid Baking Company, is here with a glittery new tutorial for you. A sparkling addition to your holiday dessert tables and displays... If you’re a cake designer, you totally understand that inspiration can strike at the strangest times! I had one of those moments not too long ago strolling through the store, shopping for Christmas decorations with my son. I literally stopped in my tracks when I spotted a twisted branch wreath decorated with the ... Continue Reading
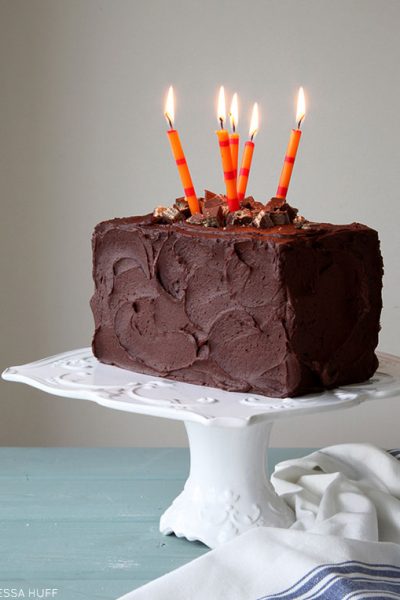
Gingerbread Latte Cake
img class="aligncenter size-full wp-image-25629" src="https://thecakeblog.com/wp-content/uploads/2013/12/gingerbread_latte_cake_pv1.jpg" alt="Gingerbread Latte Cake! Gingerbread cake, espresso buttercream and toffee bits, perfect for holiday parties and Christmas dessert | by Tessa Huff for TheCakeBlog.com" width="600" height="2075" /> Our contributor, Tessa Huff, is back with a new cake recipe perfect for the holidays…. For most people, this time of year is all about tradition and ... Continue Reading
The 6th Cake of Christmas
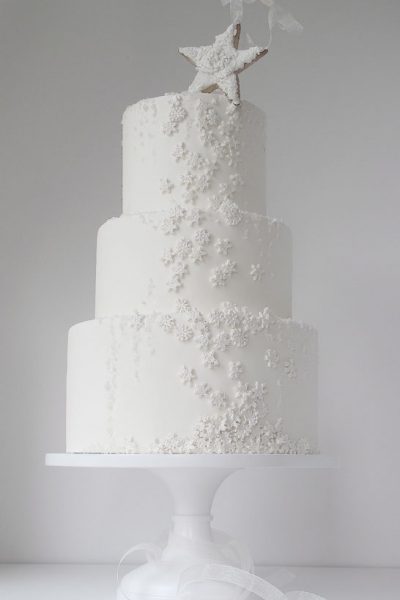
It's our third annual holiday series.... The 12 Cakes of Christmas!! We're oohing and aahing over twelve marvelous cake designs, created especially for this series! All brand new, never seen before, and created by some of your favorite bakers! For our theme this year, we're taking a moment to reflect on our favorite Christmas memories and traditions. It's a feel good month, celebrating the little things that make this season shine bright. Each of our featured bakers was asked to create a ... Continue Reading
Igloo Cake Tutorial
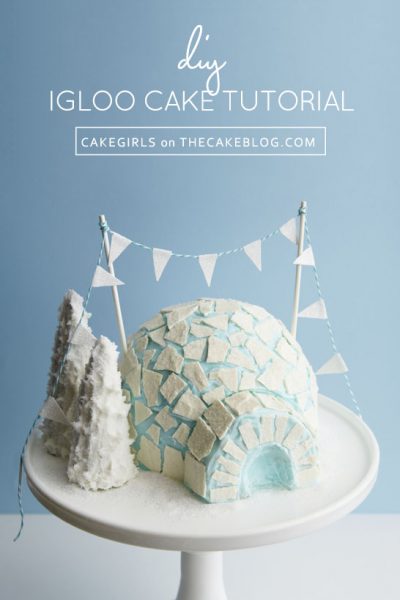
Igloo Cake Tutorial - how to make an igloo shaped cake with frosty ice pieces, sparkling trees and glittering flag banner. An adorable winter cake for holiday parties and Christmas dessert. Today we're hooking you up with a tutorial from one of the cake world's most beloved duos. For those of you, like me, who've been following bakers and style makers for years... you already know these talented sisters. Their cake designs have been featured in fabulous magazines like Real Simple ... Continue Reading
The 5th Cake of Christmas
It's our third annual holiday series.... The 12 Cakes of Christmas!! We're oohing and aahing over twelve marvelous cake designs, created especially for this series! All brand new, never seen before, and created by some of your favorite bakers! For our theme this year, we're taking a moment to reflect on our favorite Christmas memories and traditions. It's a feel good month, celebrating the little things that make this season shine bright. Each of our featured bakers was asked to create a ... Continue Reading
The 4th Cake of Christmas
It's our third annual holiday series.... The 12 Cakes of Christmas!! We're oohing and aahing over twelve marvelous cake designs, created especially for this series! All brand new, never seen before, and created by some of your favorite bakers! For our theme this year, we're taking a moment to reflect on our favorite Christmas memories and traditions. It's a feel good month, celebrating the little things that make this season shine bright. Each of our featured bakers was asked to create a ... Continue Reading
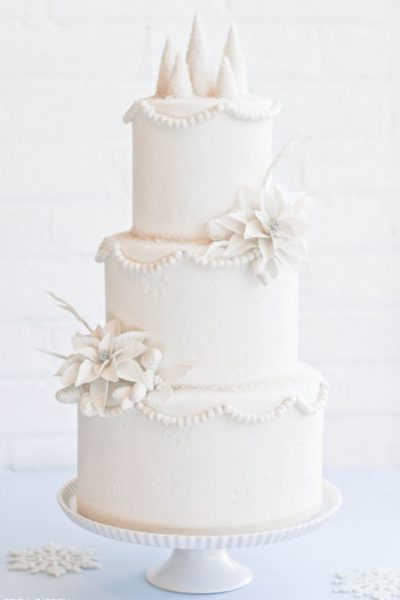
The 3rd Cake of Christmas
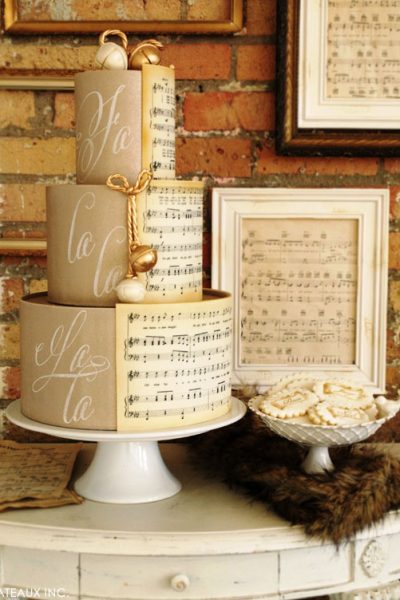
It's our third annual holiday series.... The 12 Cakes of Christmas!! We're oohing and aahing over twelve marvelous cake designs, created especially for this series! All brand new, never seen before, and created by some of your favorite bakers! For our theme this year, we're taking a moment to reflect on our favorite Christmas memories and traditions. It's a feel good month, celebrating the little things that make this season shine bright. Each of our featured bakers was asked to create a ... Continue Reading
Snow Angel Cupcakes
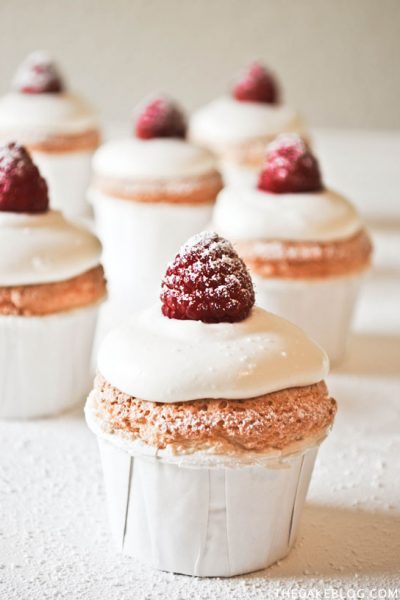
The season of entertaining is upon us. I've partnered up with Sauza® Tequila to bring you a new cupcake recipe and some inspiring ideas for a fabulous Holiday Girls’ Night! The holiday season is well underway. This is the craziest, busiest and most wonderful time of the year! Whether you're an entertaining newbie or a seasoned pro, the role of hostess can be a stressful assignment. But entertaining doesn't have to be hard. You just need a plan to make it all happen! So grab your ... Continue Reading
The 2nd Cake of Christmas
It's that time of year again! Our third annual holiday series.... The 12 Cakes of Christmas has begun!! Over the next month, we'll be oohing and aahing over twelve marvelous cake designs, created especially for this series! All brand new, never seen before, and created by some of your favorite bakers! For our theme this year, we're taking a moment to reflect on our favorite Christmas memories and traditions. As the month of December rolls on, our days often become saturated with to-do ... Continue Reading
The 1st Cake of Christmas
I can hardly stand it! It's finally time to kick off our third annual holiday series.... The 12 Cakes of Christmas!! Over the next month, we'll be oohing and aahing over twelve marvelous cake designs, created especially for this series! All brand new, never seen before, and created by some of your favorite bakers! For our theme this year, we're taking a moment to reflect on our favorite Christmas memories and traditions. As the month of December rolls on, our days often become saturated ... Continue Reading
Talking Cakes With Martha Stewart

Today's intro might be the hardest one I've ever written. I've written it, rewritten it, scrapped it completely and started again. How do you write an introduction for someone who's inspired so many? Do I reminisce about watching Martha Stewart Living in for the first time in high school? Or how I used to consider it a good work day, straight out of college, if I was home in time to catch From Martha's Kitchen at 5:30? (Yes, I'm showing my age and admitting that DVR's were not a reality ... Continue Reading
Recipe: Sweet Potato Cupcakes
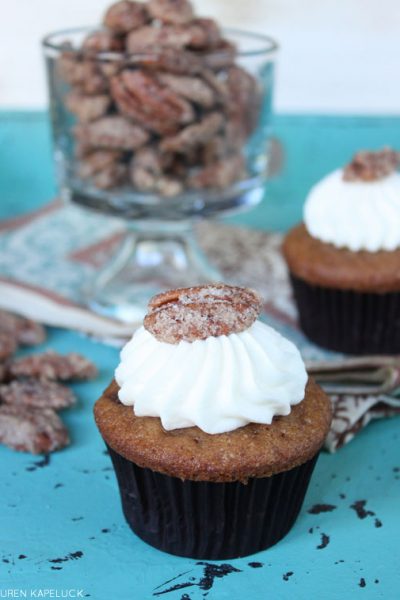
Our contributor, Lauren Kapeluck of Crave. Indulge. Satisfy., is back with a delicious new recipe for fall.... Well November is here, and that means Thanksgiving is just around the corner! One of my favorite sides from the turkey day feast is always the sweet potatoes. We've done them several ways in my family over the years, baked with marshmallows on top or as a souffle with a brown sugar pecan topping. So as a spin off to the always popular sweet potato casserole I've created a Brown ... Continue Reading
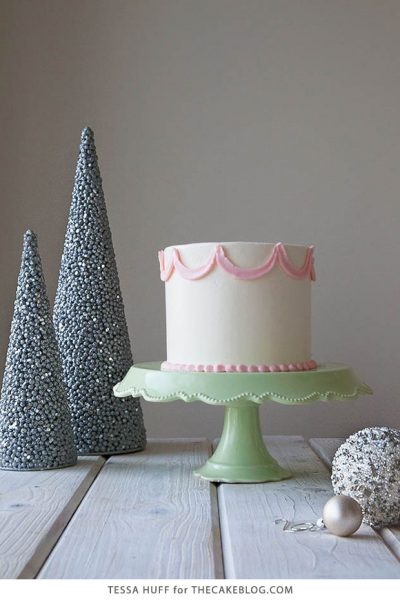
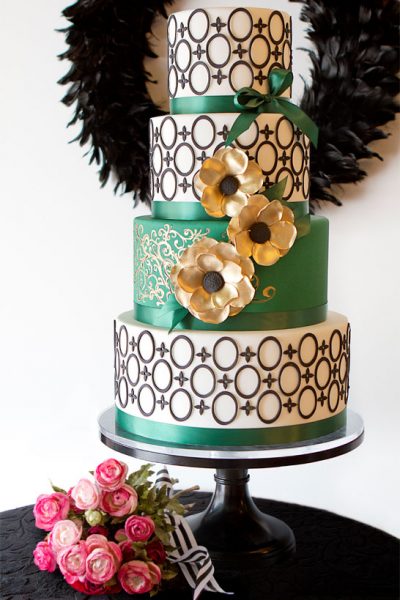
Golden Hexagon Cake
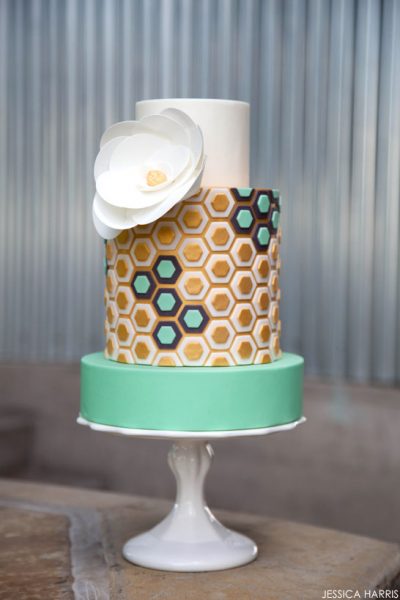
We're starting off the week with a cake that is nothing less than dreamy. A fabulous blend of 2013's hottest trends and colors, today's feature unites crisp white and mint green with a small pinch of grey and a huge dash of gorgeous gold. With a graphic print, so bold and sleek, you can't imagine how it was so perfectly placed. Not to mention a modern flower that's simply sophisticated and just the right level of minimal. It all comes together in a yummy design that will have you fantasizing ... Continue Reading
Pink Week: Romantic Wedding Inspiration
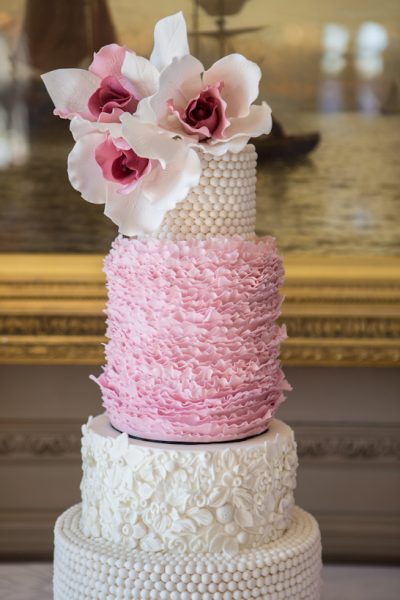
In honor of Breast Cancer Awareness Month, we’ve been celebrating with pink all week long. And we're wrapping up our pink tribute with a rare Saturday edition. Because there were just too many beautiful pink cakes in my inbox to fit into one week. So I thought we'd sneak in one more post! (If you missed any of the prior days, you can catch up here). Today's feature is a gorgeous wedding shoot filled with shades of pink and little touches of gold. With oodles of details and sweets galore, ... Continue Reading
Pink Week : Romantic Pink Ribbon Cake
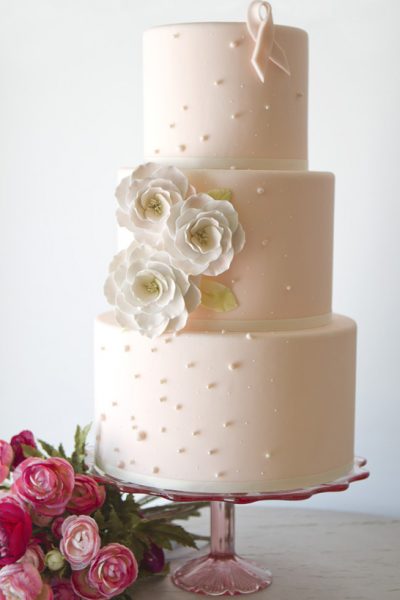
In honor of Breast Cancer Awareness Month, we’re going pink all week long. To remember, honor and support all of those who’s lives have been touched by breast cancer. It's Friday and day five of our pink fun! (If you missed any of the prior days, you can catch up here). Today's featured cake is another perfectly pink pretty. Only this time we're talking soft, blushing, pastel pink. A cake so perfectly ladylike that every last detail is impeccably groomed and ultra tailored. A mix of ... Continue Reading
Pink Week: Gold & Pink
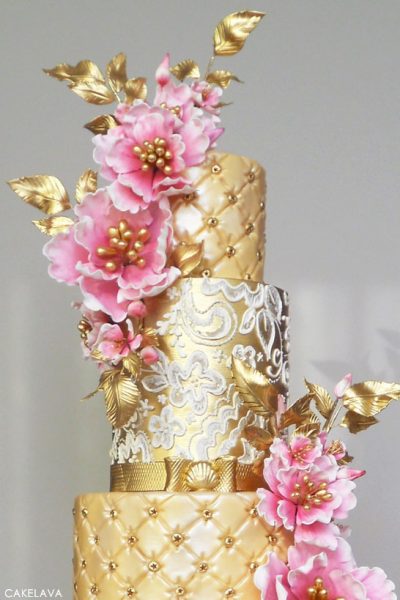
In honor of Breast Cancer Awareness Month, we’re going pink all week long. To remember, honor and support all of those who’s lives have been touched by breast cancer. Today is day four of our pink journey! (If you missed any of the prior days, you can catch up here). Today's featured cake has some seriously glam going on. It's golden from top to bottom with details galore and gorgeous pops of pink. This is definitely a statement-making cake with four tiers of fabulous. Studded quilting ... Continue Reading
Wonderland Cake
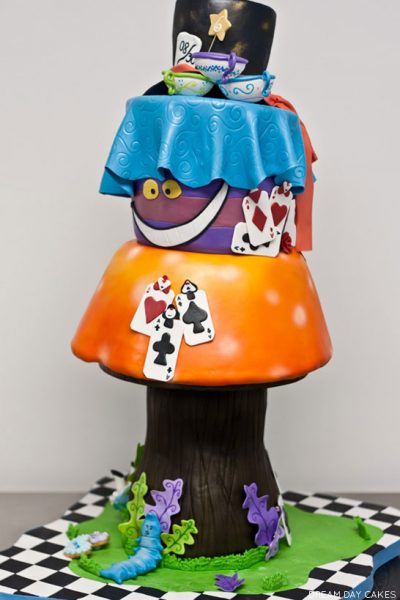
Hold on to your hats! Today, we're falling down the rabbit hole into a world of whimsical cake. Many of you already know and love Yeni Monroy of Dream Day Cakes® , located in Gainesville Florida. She is the creative mind behind cakes like this Dr. Seuss Cake and this Lalaloopsy Cake. Oh, and this amazing Halloween Cake! Well, Yeni is back again today with another fanciful cake based on the classic tale of magical doors, tea parties, mad Hatters and a girl named Alice. Yes, all of the ... Continue Reading
DIY Monster Eye Cake
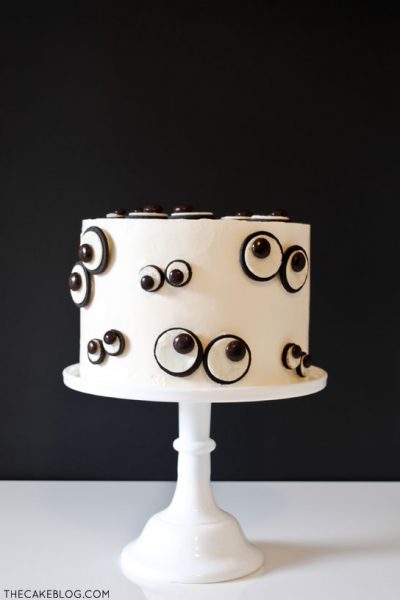
How to make a Monster Eye Cake. Make this easy Halloween monster cake at home using cookies and candies. It's Friday and the month of October is in full swing. Which can only mean one thing. It's time for some silly Halloween fun! I have a new DIY for you today and it could not be simpler. Seriously, this little cake project is for anyone and everyone. Bakers of all skill levels and ages can join in on this googly eye fun. I mean it, you really can't mess this cake up. Crooked. ... Continue Reading
Caramel Corn Cupcakes
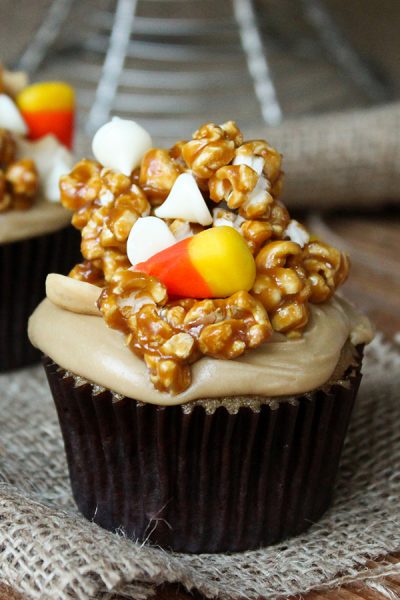
Caramel Corn Cupcakes - caramel cupcakes topped with caramel frosting and caramel popcorn studded with candy corn and cashews. A Halloween cupcake recipe by our contributor, Lauren Kapeluck of EllenJay Events. Happy Fall Y'all! I'm thrilled to be back in full swing with baking and cupcakes after a few months away. Fall is one of my absolute favorite times to bake so I couldn't let another month go by without sharing a new recipe with you all! I hope you like CARAMEL because this ... Continue Reading
Recipe: Candy Bar Cake
Our contributor, Tessa Huff, is back with a new cake recipe just in time for Halloween…. Second to pumpkin spice coffees and baked goods, who else is guilty of downing handfuls of candy this time of year? I will even admit to finishing off the Halloween stash before the trick-or-treaters pick out their costumes. However, with my perpetual diet and life-long quest to eat a little healthier and a bit less-processed, it's always a constant battle: to have or not to have Candy Corn in the ... Continue Reading
Rustic Buttercream & Sugar Flowers
Grab your cup of coffee and settle in for a few as we pour over the incredible images of today's featured cake. Because well, it's one of those cakes that will have you feeling warm and fuzzy inside. Appreciating that less if often more and that perfect doesn't always mean sleek and polished. This natural beauty is what happens when rustic meets romance and love ensues. Charming ridges of buttercream skip around the cake as if they're leading us to patches of beautiful blooms. Blossoming ... Continue Reading
Godiva Truffle Flight & Cupcake Recipe
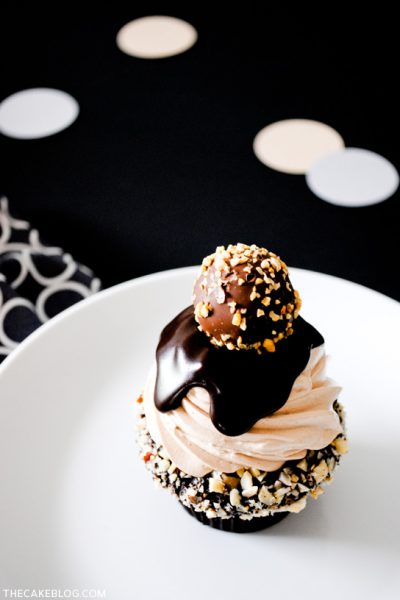
If you're like me, there is nothing more blissful than chocolate. Except maybe an evening filled with chocolate truffles, girlfriends and a glass of Prosecco! I've partnered up with Godiva to bring you inspiration for the ultimate girls' get together and a new cupcake recipe. It's a Girls' Flight Night featuring Godiva's new Truffle Flights. So it all starts with Godiva's new line of Truffle Flights. The concept is much like a flight of wine, except we're indulging in chocolate! A box of ... Continue Reading
Oatmeal Chocolate Chip S’mores Cookies
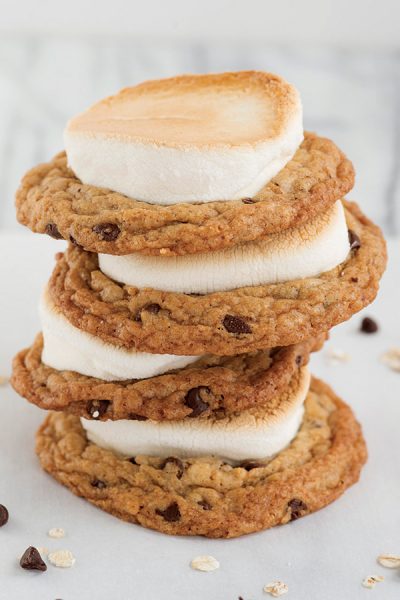
Oatmeal Chocolate Chip S'mores Cookies! A s'mores inspired cookie recipe filled with oats, graham cracker crumbs, chocolate chips and toasted marshmallow. Fall is officially here and the season is really starting to take shape. It's a time for crisp nights and blazing bonfires. And you know what that means, right? It's s'mores time! Yes, I think I could find a way to enjoy s'mores any day of the week, any month of the year. We've all watched as this classic treat exploded into every ... Continue Reading
DIY: Revitalize Your Kitchen Canisters
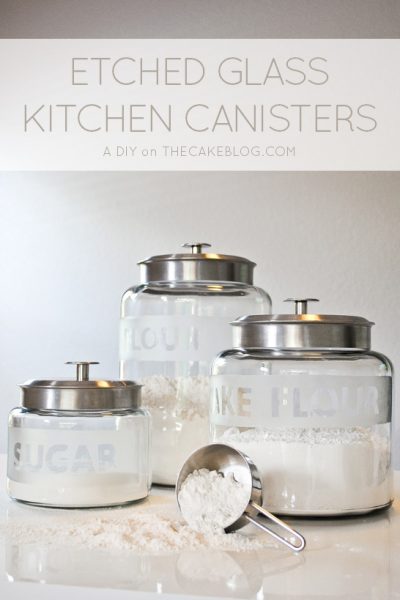
If you're like me, you spend a whole lot of time in your kitchen. So I've partnered up with The Home Depot to help you revitalize and redesign your favorite room. Today's post is all about creating a dreamy new kitchen perfect for baking! If you've been following along, you may remember that we recently moved into a new house. We move fairly often for my husband's job (which is one of the main reasons I blog about cake instead of owning a physical store). Our most recent move came with a ... Continue Reading
Flowing Rose Cake
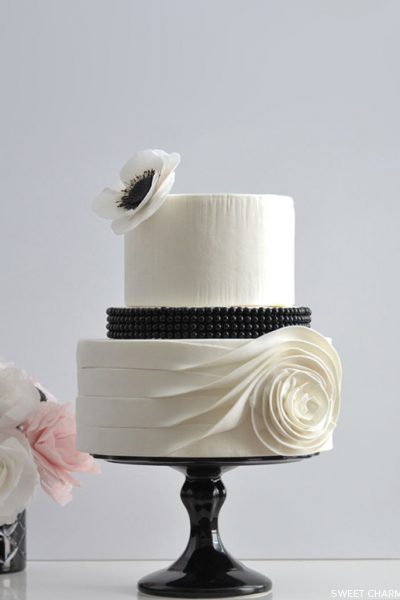
For years we've celebrated new and creative ideas when it comes to cake. Yet, it never gets old. I still get excited to see bakers trying new things and tinkering around with the possibilities of sugar. Which is why I love today's cake! It puts a fabulous spin on a classic idea and is sure to catch your eye. A classic fondant rose is elevated to a whole new level of chic as it gracefully flows across the entire bottom tier. Black pearl beading and a single anemone add a touch of ... Continue Reading
- « Previous Page
- 1
- …
- 7
- 8
- 9
- 10
- 11
- …
- 16
- Next Page »
