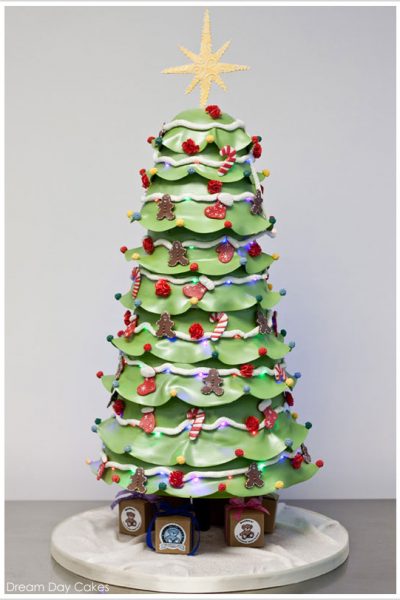
The 12 Cakes of Christmas is off to a fabulous start! Twelve days of beautifully festive cakes, created especially to inspire you to holiday greatness! Twelve talented bakers were asked to create innovative and elegant designs appropriate for both Christmas parties and winter weddings. And along the way, we get an up close look at what inspires this talented group. It’s 12 bakers baking…. it’s The 12 Cakes of Christmas! The third cake in our series comes to us from Yeni Monroy and her ... Continue Reading
Search Results for: white
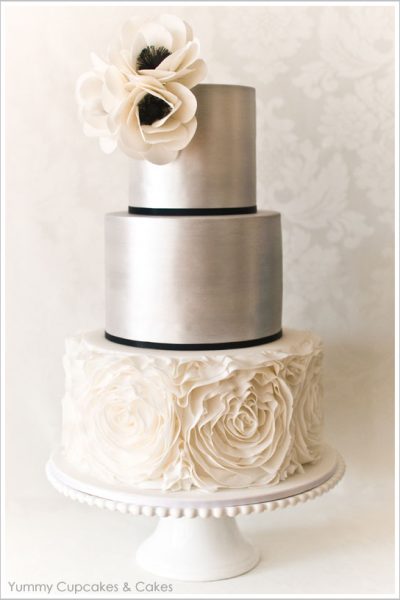
2nd Cake of Christmas
Yesterday, The 12 Cakes of Christmas officially began! I'm thrilled to say that this is the second year for this cake series. And it is bigger and better than ever! Twelve days of beautifully festive cakes, created especially to inspire you to holiday greatness! Twelve talented bakers were asked to create innovative and elegant designs appropriate for both Christmas parties and winter weddings. And along the way, we get an up close look at what inspires this talented group. It’s 12 bakers ... Continue Reading
Apple Pie Cupcakes
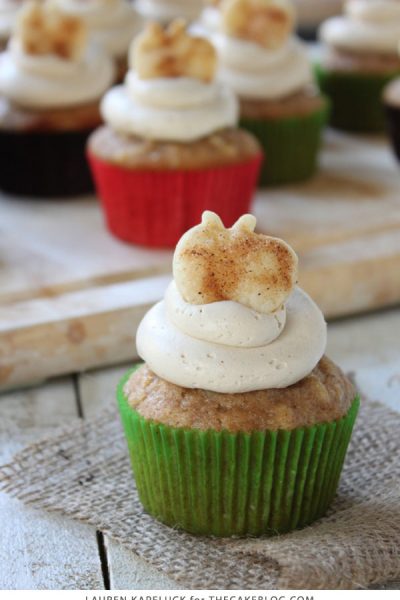
Apple Pie Cupcakes! Fresh apple cupcake recipe with apple pie filling and brown sugar cinnamon buttercream frosting, topped with pie crust cutouts. Created by our contributor, Lauren Kapeluck of EllenJay Events. One of my absolute favorite things about fall is eating pies! Apple, pumpkin, pecan, you name it and I will gobble it right up! So when Carrie mentioned she wanted me to create an apple themed cupcake recipe for November, I immediately thought of apple pie! I am an apple pie ... Continue Reading
Autumn Blooms Cake
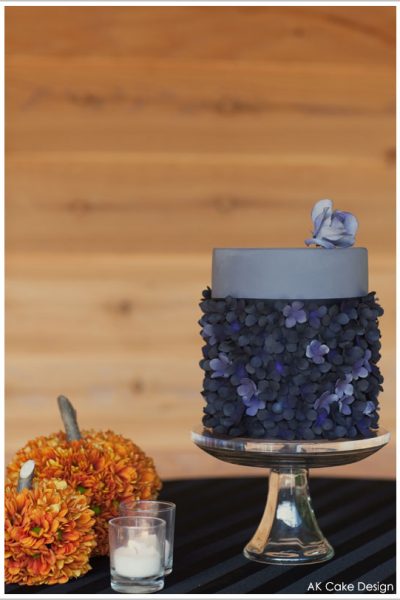
Everywhere I look, the holiday season is upon us. Retail stores are prepping for Christmas shopping. Holiday catalogs are arriving in the mail. Blogs are posting new Christmas inspiration. Pinterest is full of crafts and recipes to try! But I try not to rush the season here on the blog, when possible. So I'd like to linger and celebrate the feeling of Fall, just a little while longer. Which happens to be a pretty easy task when you have a spectacular Autumn cake to swoon over! With ... Continue Reading
DIY : Pink Ribbon Cake
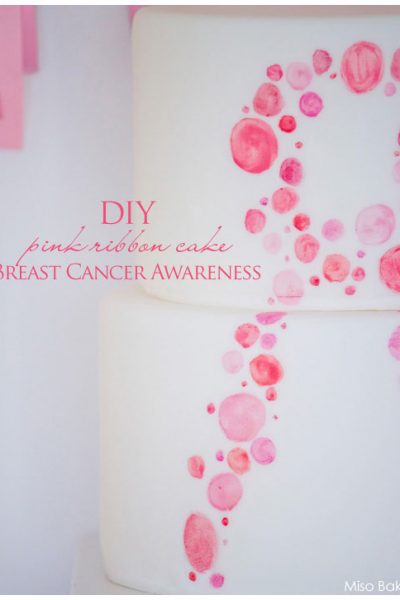
Our contributor, Miso Bakes, is sharing a new DIY in honor of Breast Cancer Awareness Month ... This cake is dedicated to all the fighters. This cake is dedicated to all the survivors. This cake is dedicated to those who have succumbed to their battle. This cake was created with much hope that we will soon find a cure to breast cancer. As many of you know, October is Breast Cancer Awareness month and I wanted to play a very small part in helping raise awareness by creating this ... Continue Reading
Marshmallow Spiderweb Cake
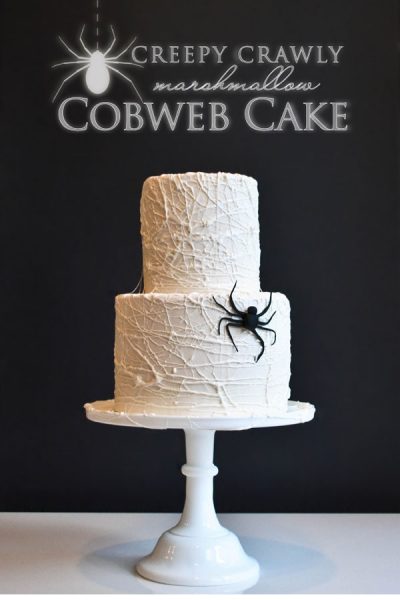
As seen on the cover of Country Living Magazine, October 2013! Now that we're officially in the Halloween spirit and inspired to bake, here is a super easy DIY for you to try at home. There's no piping, no painting and no wrong way to do it! You just need marshmallows, two hands and some imagination! It's a creepy, crawly Marshmallow Spiderweb Cake! And I have a simple tutorial to show you how to do it! You know how marshmallows get stringy when melted? Well that makes for a super ... Continue Reading
Halloween Week : Vintage Goth
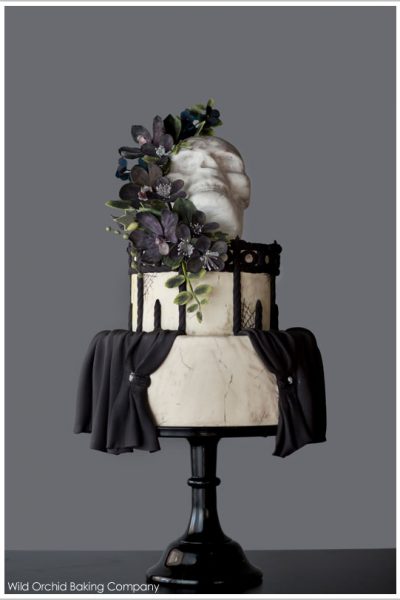
Today is the final day of our new cake series, EEEK It’s Halloween Week! Five talented bakers were asked to create new designs inspired by Halloween. To bring the spirit of the holiday to life in a modern cake design like none we had seen before. Each baker was given a basic black and white color scheme and a specific genre, creating a week of inspiring cakes for everyone. We've seen everything from whimsical to couture.... but it is Halloween Week after all. So today we have something a ... Continue Reading
Halloween Week : Whimsical
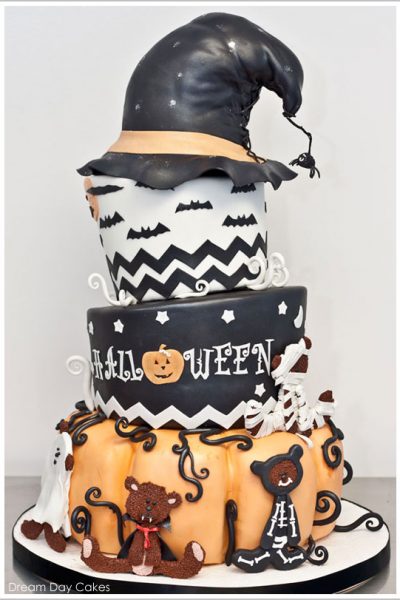
Today is day four in our new cake series, EEEK It’s Halloween Week! Five talented bakers were asked to create new designs inspired by Halloween. To bring the spirit of the holiday to life in a modern cake design like none we had seen before. Each baker was given a basic black and white color scheme and a specific genre, creating a week of inspiring cakes for everyone. And today is we're moving on to the Whimsical category. This third Halloween cake comes to us from Yeni Monroy and her ... Continue Reading
Halloween Week : Glittery Glam
Today is day three in our new cake series, EEEK It’s Halloween Week! Five talented bakers were asked to create new designs inspired by Halloween. To bring the spirit of the holiday to life in a modern cake design like none we had seen before. Each baker was given a basic black and white color scheme and a specific genre, creating a week of inspiring cakes for everyone. So far we've seen the Classic Halloween category followed by the Modern Chic. And today we're moving on to Glittery ... Continue Reading
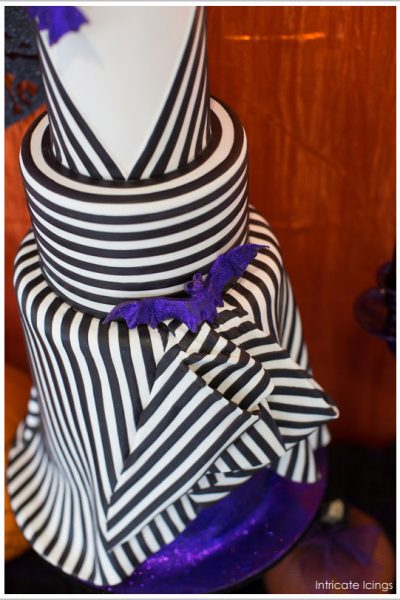
Halloween Week : Modern Chic
Today is day two in our new cake series, EEEK It's Halloween Week! Five talented bakers were asked to create new designs inspired by Halloween. To bring the spirit of the holiday to life in a modern cake design like none we had seen before. Each baker was given a basic black and white color scheme and a specific genre, creating a week of inspiring cakes for everyone. Yesterday's cake was all about Classic Halloween Fun. And today's cake is made Modern Chic! This second Halloween cake ... Continue Reading
EEEK! It’s Halloween Week!
Beware: BOO-tiful cakes lie ahead! We’re kicking off a brand new series here on The Cake Blog... an entire week of fabulous Halloween cake inspiration created by some of your favorite bakers! Five talented cake artists were asked (pretty, pretty please) to create innovative new designs, appropriate for a sophisticated yet spooky Halloween. Armed with a basic Black & White color scheme and a predetermined category, each baker set off to create something spooktacular! The end result is a ... Continue Reading
Chevron & Gold Dessert Table
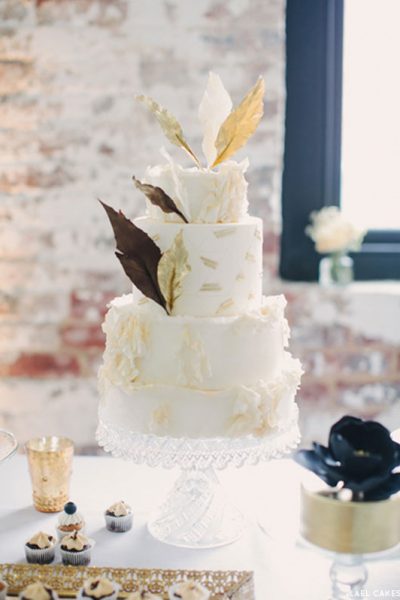
Today's post is a perfect combination of elegance and charm. A dessert table featuring gorgeous cakes, tempting mini desserts and an abundance of style! Emily of Lael Cakes, located in Brooklyn, created this display for The Cream Event NYC and goodness... did she go for fabulous or what? Emily pulls together several of today's hottest trends including chevron, gold and feathers into one spectacular display. There's a whole lot to love about this Chevron & Gold Dessert Table... so I'll ... Continue Reading
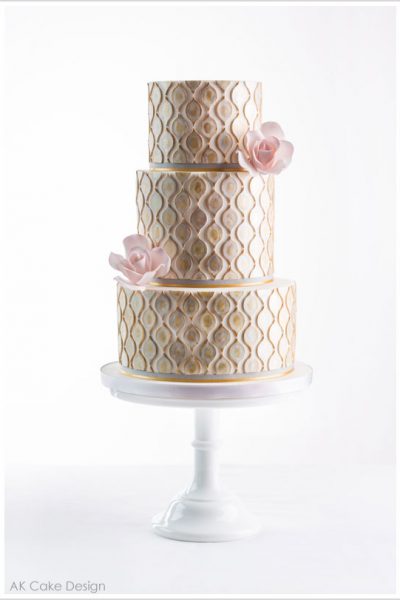
Golden Chevron Cake
Today's featured cake is a sophisticated design with great white on white texture, modern lines and subtle gold accents. Crisp white fondant is perfectly polished, creating an ultra tailored appearance. Delicate sugar broaches, strings of sugar pearls and diamond-like gems add a touch of luxury to an already refined design. And then there is the gorgeous chevron. Thin lines of hand-painted gold chevron! Oh chevron... you're a trend worth keeping. Especially when used so exquisitely. All ... Continue Reading
Vintage Toys & Burlap
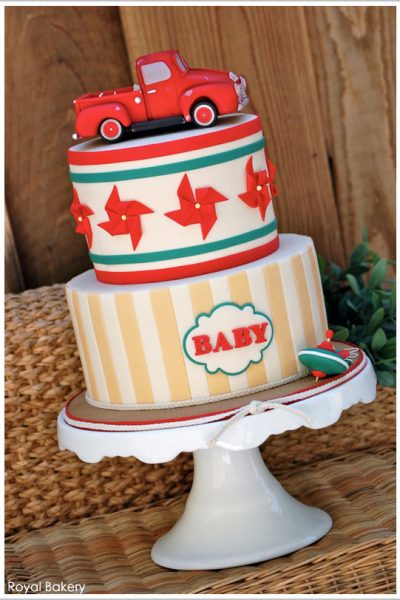
Today's featured cake is so ridiculously adorable, you're going to flip when you see it. Flip... like a spinning top flips! Created for a Vintage Toy Baby Shower, this design is full of old-fashioned fun! Charming details like a spinning top, yo-yo and pinwheels set the stage for childhood nostalgia. While a toy truck topper drives us back to the good-old-days with its incredible details and teddy bear passenger. Rich red and teal are paired with a light linen and burlap accents (love) to ... Continue Reading
Thing One & Thing Two Cake
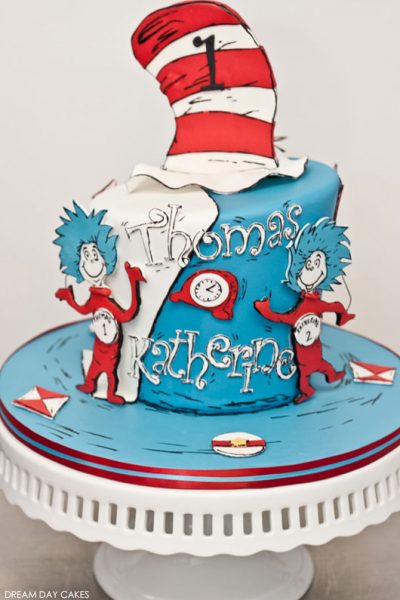
Dr. Seuss himself would be excited about today's cake. It's playful. It's charming. It's just down right seussical! Created for a twin's first birthday celebration, this design brings Seuss's classic book, The Cat in the Hat, to life. From the Cat's iconic striped hat to his umbrella and ball, no detail is too small. But the real stars of this cake are Thing One and Thing Two, perfectly adapted in honor of the birthday boy and girl. Their kites are flying and the sky is the limit! Join ... Continue Reading
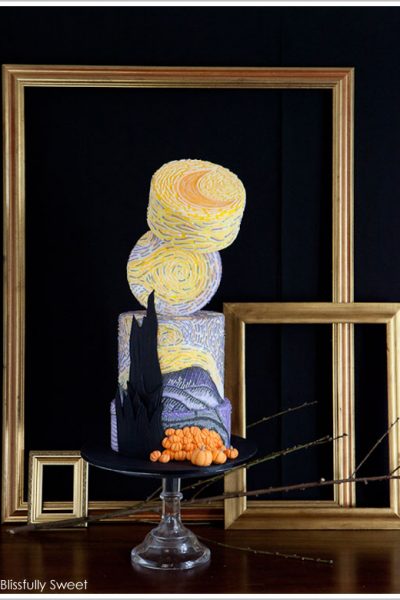
Beach Week: Ocean Sunset
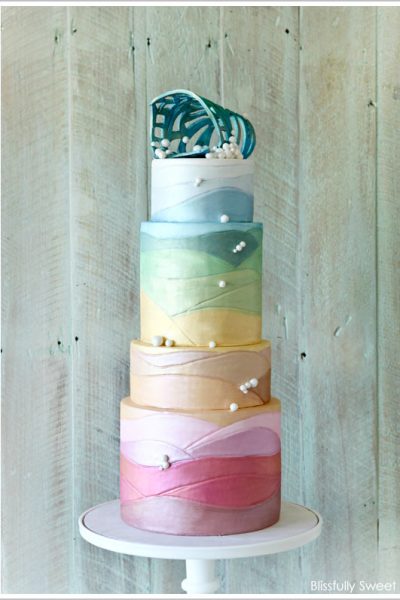
Our end of summer celebration is in full swing! It's Beach Week here on the cake blog and we're having some serious fun in the sun. Four talented bakers were asked to create new designs inspired by the sun, sand and surf. To bring the beauty and colors of the beach to life in a sophisticated cake design. And today's cake is simply spectacular! Our third beach-inspired design comes to us from Jacki Fanto, owner of Blissfully Sweet in Sydney Australia. You may remember Jacki from ... Continue Reading
Beach Week : Nautical Cake & DIY
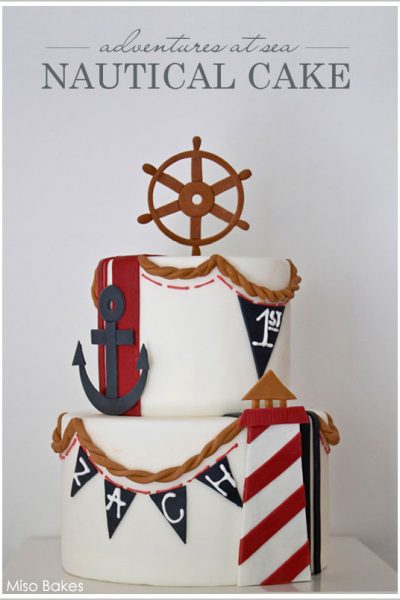
Today we're continuing on with our end-of-summer celebration. It's Beach Week! And so far we're having a ball! You all keep crashing our site with your excitement over the amazing KitchenAid Mixer Giveaway that we're hosting. And rightfully so... who doesn't want a KitchenAid? Let alone a 7 quart, top of the line version! So if you haven't entered... HERE's the link! Now, let's get back to the cakes, shall we? Get ready to set sail because today we're going out on the water! Our second ... Continue Reading
From Dress to Cake :: Ruffled Rosette
Today's cake is quite possibly one of the most gorgeous cakes to grace this blog. I know, I know... that is a very big statement. One hard to live up to considering all of the incredible cakes showcased over the years. But I think you'll soon agree! So put your coffee down and have a seat because today's cake may simply take your breath away! As if a spectacular cake wasn't enough, we're also taking a peek into the mind of the talented creator. You know how I love seeing the inspiration ... Continue Reading
Candy Fruit Slice Cakes
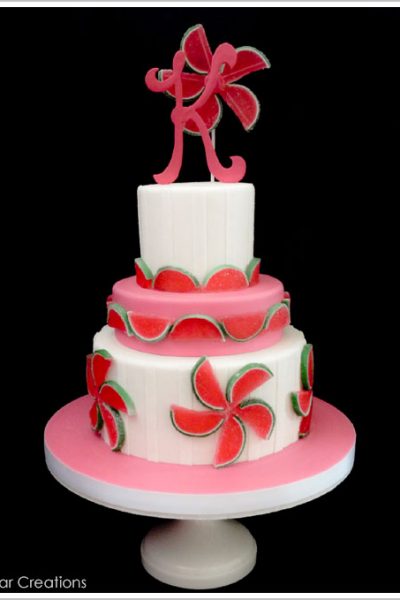
Today's cakes feature a fabulously fun idea that I know you are going to love! With a fresh and fruity twist, these cakes are perfect for summer fun! Candy fruit slices become the star in these whimsical designs by Rebecca Sutterby, owner of Sugar Creations in Kansas. One design is all about lemon while the other is pink, green and perfectly watermelon. Both are ridiculously cute, not to mention incredibly creative! So let's enjoy the sweet taste of summer with these delightful Candy Fruit ... Continue Reading
Summer Cake Trio
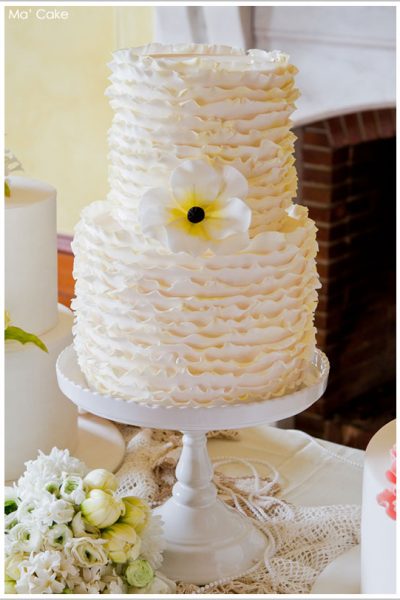
I know, I know. It's been too quiet here the last few weeks... but we're back on track and starting the week off with a big helping of cake inspiration! Today's post is so packed full of pretty cakes that it's like three posts in one. Seriously! Today's featured cake is not one cake but three! Yes, a stunning cake trio created by Leony Schiller from Ma’ Cake in Sydney, Australia. This set of three is cheery, bright and oh-so-beautiful. From smooth and sleek fondant to elegant ruffles and ... Continue Reading
Carved Chocolate Ganache Cake
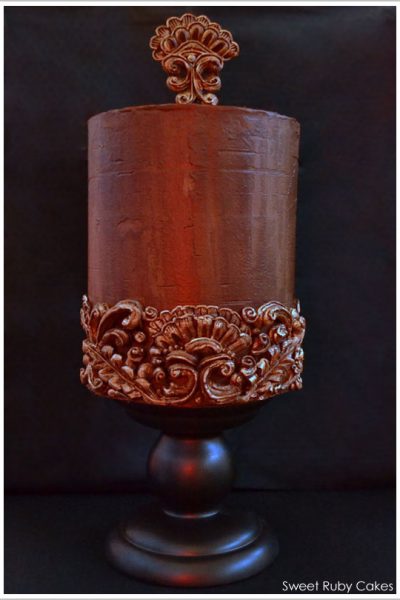
Yes, you read the title right. Carved Ganache. Honestly, the thought of carving ganache has never even crossed my mind. And I did a double take when I first saw this cake in my inbox. But that is the wonderful thing about this blog... talented, creative bakers across the globe keep us all inspired and wanting to do more! And Trina Thomson of Sweet Ruby Cakes in Australia is pushing the chocolate cake boundaries with her latest creation. Inspired by antique wall molding, this cake is ... Continue Reading
DIY Lemon Slice Cake Toppers
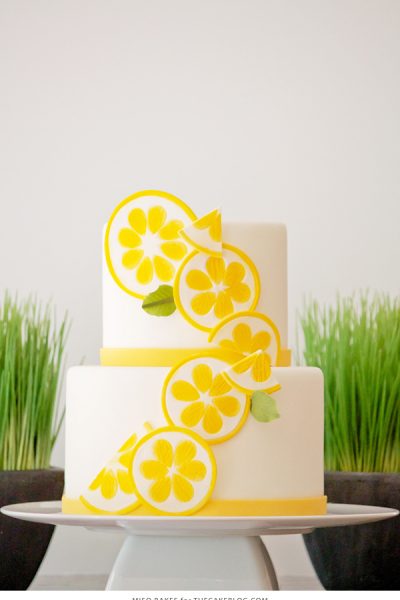
Our contributor, Miso of Miso Bakes, is sharing a new DIY with a fresh take on lemon ... Growing up, my grandparents always took my siblings and I on a long walk around the neighborhood after dinner. As a matter of fact, this is one of my fondest and most cherished childhood memories. My favorite walks were those taken during the summer months when it was still bright outside. The warmth gently embraced my skin and the occasional breeze made the vibrant green leaves on huge trees ... Continue Reading
Patriotic Pinwheel Cupcakes
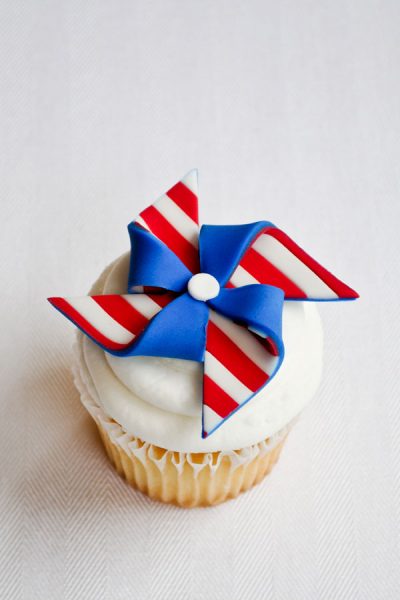
Patriotic Pinwheel Cupcakes - how to make fondant pinwheel cupcake toppers in red, white and blue. So much fun for the Fourth of July! Last Monday, I shared a fun new tutorial as a guest post over on The TomKat Studio. My Patriotic Pinwheel Cupcakes! Your response to these fondant pinwheel toppers has been wonderful! I shared the step by step instructions to make the basic solid colored pinwheel {here} but many of you have asked about the peekaboo patterns. The bold stripes and ... Continue Reading
Ruffled Flag Cake
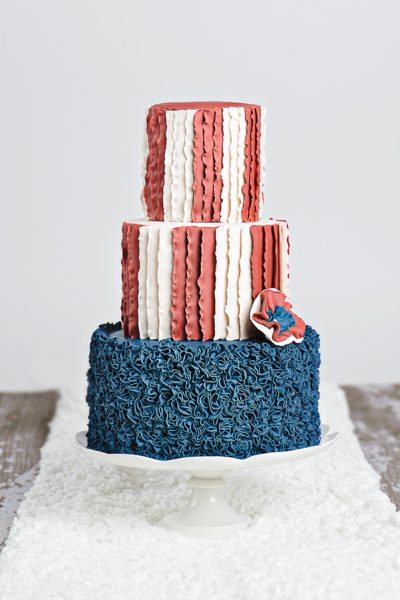
Today is the fourth and final day in our new cake series, The 4 Cakes of July! Four talented bakers were asked to create new designs inspired by the 4th of July holiday. To bring the beauty and colors of the American flag to life in a modern cake design like none we have seen before. And today’s cake is red, white and beautifully bold! This fourth American beauty comes to us from Rachel Skvaril, owner of Fondant Flinger in Kodiak, Alaska. You may remember Rachel from previous features on ... Continue Reading
American Flag Wedding Cake
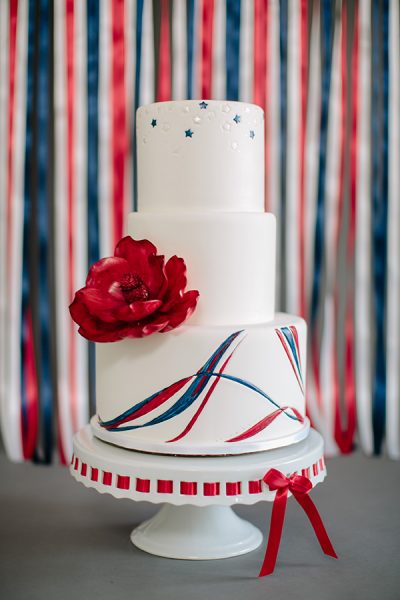
Today is day three in our new cake series, The 4 Cakes of July! Four talented bakers were asked to create new designs inspired by the 4th of July holiday. To bring the beauty and colors of the American flag to life in a modern cake design like none we had seen before. And today's cake is all about refined elegance! This third American beauty comes to us from Rachael Teufel, owner of Intricate Icings Cake Design in Erie, Colorado. Rachael has been inspiring us with her beautiful cakes for ... Continue Reading
Vintage American Patriotic Cake
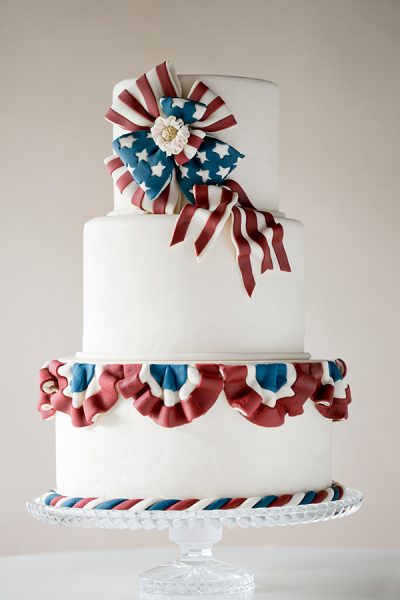
Today is day two in our new cake series, The 4 Cakes of July! Four talented bakers were asked to create new designs inspired by the 4th of July holiday. To bring the beauty and colors of the American flag to life in a sophisticated cake design like none we had seen before. And today's cake is vintage elegance defined! This second American beauty comes to us from Erin Gardner of Erin Bakes. You may remember Erin from previous features on our site (like her rainbow cake and her honeycomb ... Continue Reading
American Quilt Cake
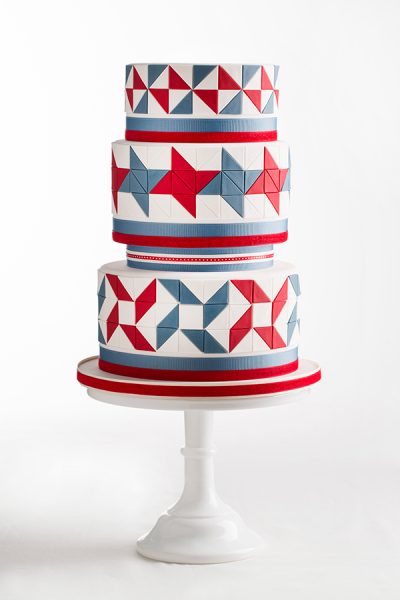
Today is the first day of our newest cake series, The 4 Cakes of July! Four talented bakers were asked (pretty, pretty please) to create new designs inspired by the Fourth of July holiday. To bring the beauty and colors of the American flag to life in a sophisticated cake design. There will be no flag sheet cakes here... these cakes are gorgeous and like none we've seen before. Red, white and beautiful cakes created just for you! And I'm beyond thrilled to share these cakes with you! I'm ... Continue Reading
- « Previous Page
- 1
- …
- 10
- 11
- 12
- 13
- 14
- …
- 16
- Next Page »
