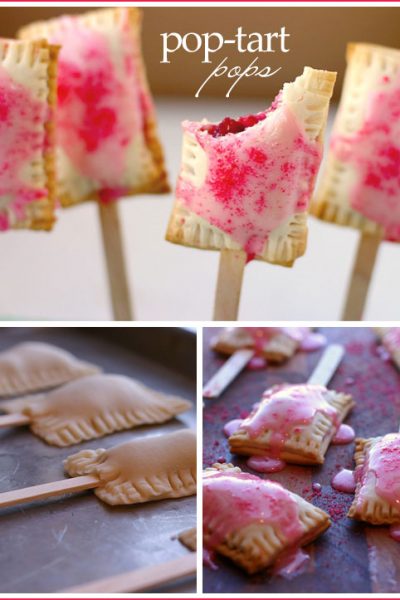
The adorable pie pops in yesterday's Snow Sprinkle post reminded me of something I've been dying to feature. Inspired by Bakerella and created by Brooke McLay of The Family Kitchen, these Poptart Pops are just too cute! Children of all ages love Poptarts and these darling 'mini pops' take them to a whole new level. Modern, bite-sized and fun, these cherry Poptarts on a stick would be the hit of any party! So much fun, right? Brooke, you are a pop genius! Hop on over to The Family Kitchen ... Continue Reading
Search Results for: pop tarts
Witch Cauldron Cake
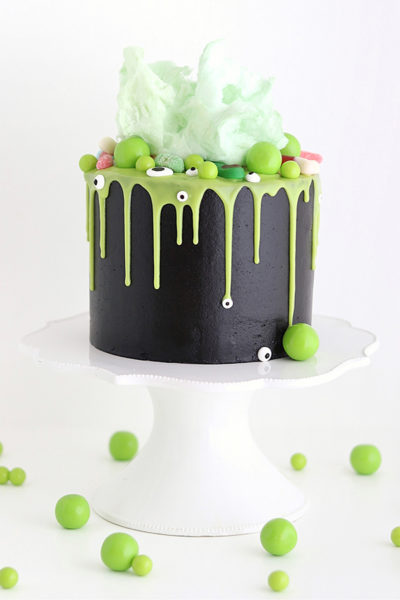
Witch Cauldron Cake - how to make an amazing Halloween cauldron cake that looks like bubbling witches' brew with black buttercream, green ganache and gummy candies. A new tutorial by our contributor Whitney DePaoli. It’s the season of spooky desserts and I could not be more excited about it! I look forward to Halloween every year because it seems to bring about a wild sense of creativity and endless inspiration, especially when it comes to cake. This year I’m all about this Witch ... Continue Reading
Cream Tart Tree Cake
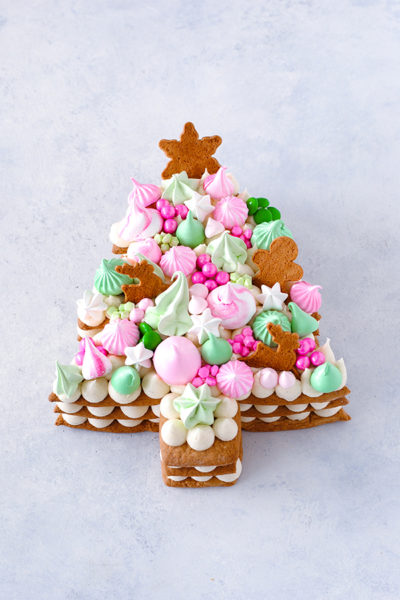
Cream Tart Tree Cake - shaped like a Christmas tree, this holiday version of the popular cream tart number cake has gingerbread cookies layered with cream cheese frosting and is topped with meringue kisses, chocolate, sprinkles and more gingerbread cookies! We're officially kicking off our holiday content! And it only seemed fitting that the most popular cake trend of 2018 make an appearance in our line up. The cream tart number cakes that took over Instagram and Pinterest this year are ... Continue Reading
Animal Skeleton Cake
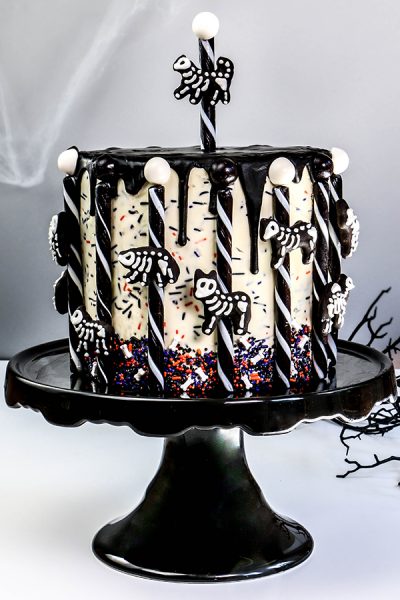
Animal Skeleton Cake - a carousel cake full of spooky animal cracker skeletons, with a playful sugar skull vibe. A new Halloween / Day of the Dead tutorial by our contributor Erin Gardner. Halloween is my favorite holiday, because it’s all about having fun. I love cutesie-spooky things and tend to shy away from the more realistic and gory side of the day. This is why I’m going to ask you to come along with me and take some artistic liberties when it comes to skeletal accuracy. I ... Continue Reading
Spiderweb Cake
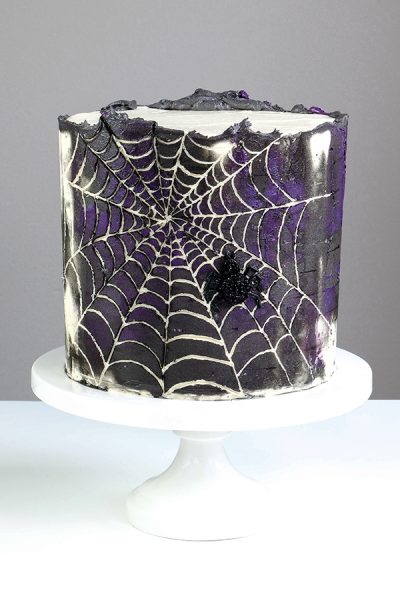
Spiderweb Cake - how to carve buttercream icing to make a spooky spiderweb cake design. So easy and no need to pipe! A new Halloween tutorial by our contributor Erin Gardner. As I’ve stated a number of times in many other cake decorating tutorials, I’m not a fan of piping. I envy those with a steady hand and firm resolve to pipe, but I am not one of them. So when I had the idea for a simple but spooky Halloween cake involving a sparkly candy spider, I had to figure out how to make a web ... Continue Reading
Snow Globe Cookies

Snow Globe Cookies - Learn how to decorate sparkly, snow globe sugar cookies for the holidays with a simple step-by-step tutorial by our contributors, Mary and Brenda Maher of Cakegirls. When you're an enthusiast baker, like we all are, Christmas is game time and our time to shine. Occasional baking suddenly becomes daily baking and the idea of sharing our favorite recipes and honed skills brings joy to our hearts. In order to fit it all in, we made a better plan. Instead of making ... Continue Reading
Chocolate Orange Cake
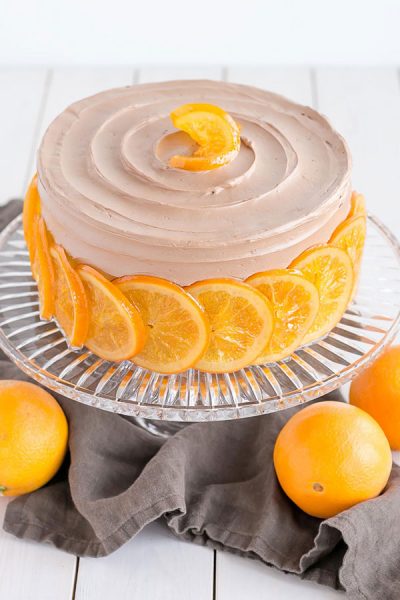
Chocolate Orange Cake - a citrus layer cake recipe infused with orange zest and orange syrup, topped with silky chocolate frosting and candied orange slices. By our contributor, Olivia Bogacki. Happy New Year everyone! You’ve survived through the first bit of January, what I consider to be the most challenging time of the year. Coming off a holiday high and getting back to the real world is not fun and I, for one, am having a hard time letting go of the holiday season. Nevertheless, ... Continue Reading
Holly Gift Box Cake
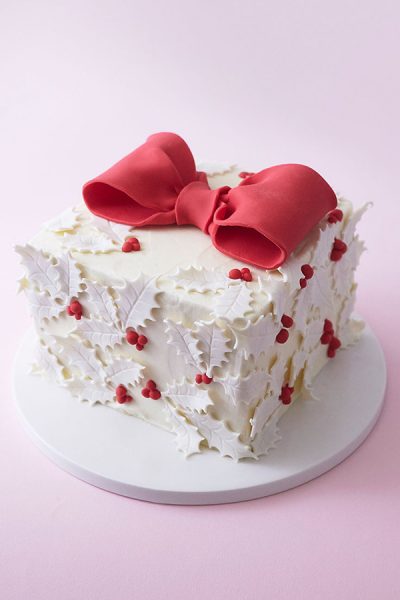
Holly Gift Box Cake! Learn how to make this festive gift box cake that looks just like a present with a simple step-by-step tutorial by our contributors, Mary and Brenda Maher of Cakegirls. This is certainly the season for making cookies. Lots of 'em. But that doesn't mean there's not room for a spectacularly decorated Christmas cake, especially if it'll make a great centerpiece at the next holiday party. That's where this textured Holly Gift Box Cake comes in. Part mistletoe, part ... Continue Reading
Pirate Skull Cake
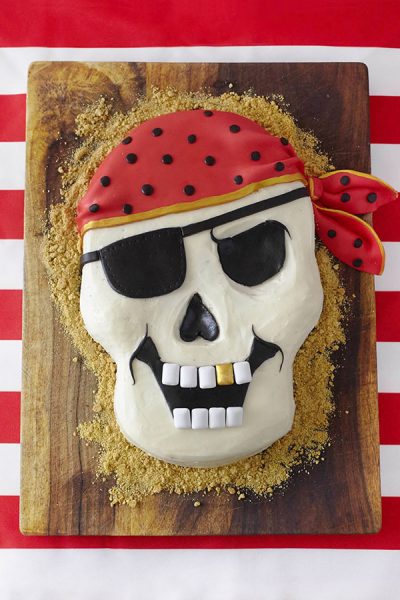
Our contributors, Mary and Brenda Maher of Cakegirls, are sharing a DIY Pirate Skull Cake tutorial. Easy to make and perfect for pirate birthday parties! We love making themed cakes for kids. There's just something about carrying out a cake to that little girl or boy, and having their eyes pop because you made them feel so special. And, it seems as though all kids go through their dinosaur, pirate, princess or ballerina phase, so themed kids cakes become part of every cake decorator's ... Continue Reading
Cake Gems
Our contributors, Mary and Brenda Maher of Cakegirls, are back with a new tutorial! When you've been making cakes for a long time, you work hard to hone your skills and really discover your aesthetic as a cake maker. Sometimes you feel like you've "found your voice" and other times you feel like you're in a bit of a rut. That's why it's so exciting to see new and inspiring cake trends appear, opening your eyes to how others approach design and their refreshing take on treats you might never ... Continue Reading
Lemon Bundt Cake
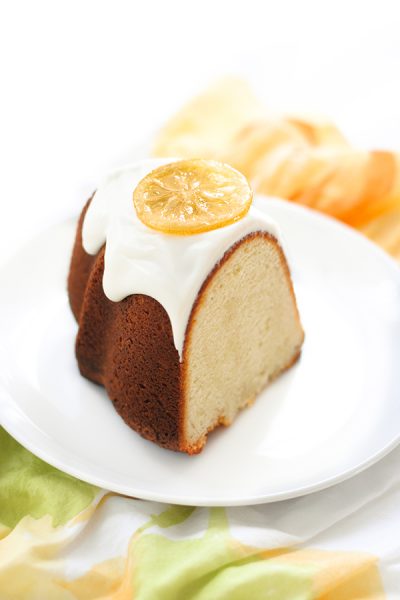
Lemon Bundt Cake - easy lemon pound cake recipe that packs a powerful lemon punch, topped with a relaxed cream cheese glaze and candied lemon slices. Another holiday is almost upon us and I don't know about you, but it feels like Christmas was just yesterday. I love going all out for holidays, but sometimes reality sets in and you have to timebox your projects a tad. You know, so you can actually spend time with your family celebrating the holiday! If you can relate to life being on ... Continue Reading
Whipped Cream Cubes

Frozen whipped cream cubes for holiday hot chocolate! Make ahead and keep in the freezer for festive drinks all season long. A new Christmas dessert, sponsored by International Delight. When the weather turns cold and the holidays are upon us, there's nothing like snuggling up with a cup of something warm, creamy and delicious. Like Hot Cocolate! Today we're pouring a mug of the good stuff and topping it with festive whipped cream cubes. These fun little toppers start with homemade ... Continue Reading
Sprinkle New Years Eve Cake
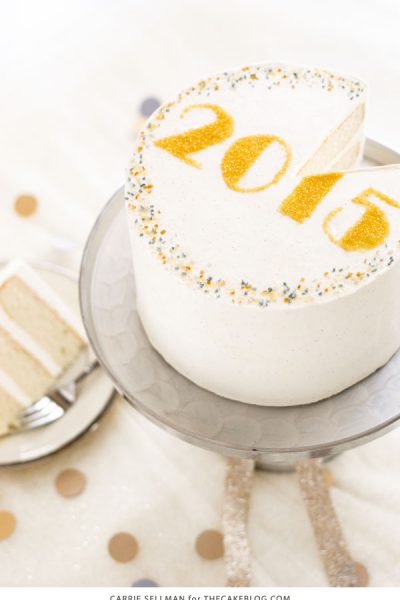
Sprinkle New Years Eve Cake - how to make a sparkly NYE cake using a free stencil template and sprinkles. Updated with a 2019 template! Hello friends! I hope you're enjoying the holiday season so far and that your Christmas was a merry one! I'm popping in for one last cake tutorial for the year, just in time for your New Years Eve celebration. I know, I know! Talk about last minute planning! But surely I'm not the only one who looks up and realizes that NYE is a day away. Anyone ... Continue Reading
Christmas Gallery
CREAM TART TREE MINI ORNAMENT CAKES CHOCOLATE TOFFEE CRUNCH NUTCRACKER CAKE CRANBERRY ORANGE CAKE WREATH CUPCAKES SNOWFLAKE CAKE PRESENT CUPCAKES HOT CHOCOLATE CAKE GINGERBREAD CUPCAKES BIRCH LOG CAKE EGGNOG CAKE SNOW GLOBE COOKIES SNICKERDOODLE CUPCAKES EASY SUGAR COOKIES WHITE CHOCOLATE PEPPERMINT CHAMPAGNE CAKE WINTER HAT CAKE PEAR CAKE GIFT BOX ... Continue Reading
Banana Choco Hazelnut Cake
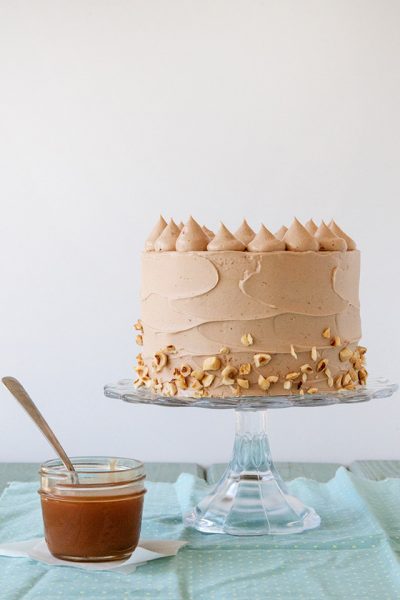
Our contributor, Tessa Huff, is sharing a chocolate hazelnut cake recipe. Banana cake with chocolate ganache filling and chocolate hazelnut buttercream. It's the peak of summer, and I am sure we are all starting to feel the heat. You are most likely reaching for all your favorite frozen treats every afternoon. One of my favorites is a frozen chocolate-dipped banana. Yumm! I've been seeing recipes for bite-sized varieties pop up on several of the desserts blogs lately, so I was ... Continue Reading
Petite Apple Desserts
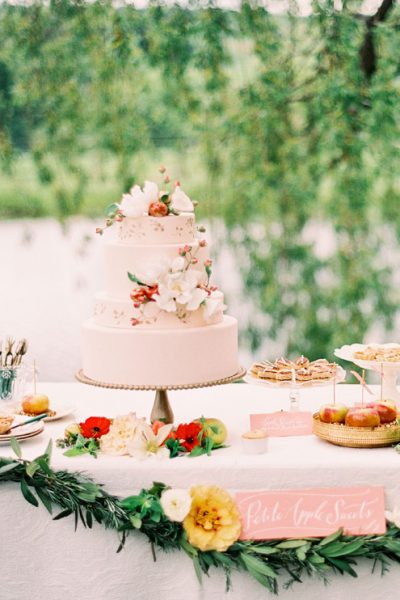
It's a beautiful day! We're starting off another fabulous week of cake inspiration with a dessert table that is filled to the brim with natural charm... and apples! Today's feature comes to us from Emily Lael Aumiller of Lael Cakes in Brooklyn. We're still swooning over Emily's gorgeous Chanel Meets Brooklyn table from last week (catch it here), so we're definitely excited to welcome this talented baker back to the blog again today. This time the look is rustic yet elegant in tones of soft ... Continue Reading
Cranberry Orange Cupcakes
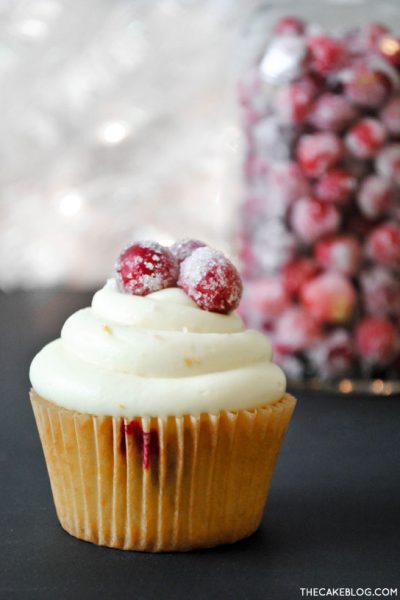
I love this time of year when the holidays are just around the corner. It's not quite Thanksgiving yet and Christmas is still on the horizon. But the spirit of the holiday season is already here! I'm itching to start decorating for Christmas and it's taking every ounce of my willpower to wait until after Thursday. But my Christmas shopping is another story all together! I've been rocking check marks on my list for about a week now and it feels pretty good. I'm never this early with my ... Continue Reading
Caramel Corn Cupcakes
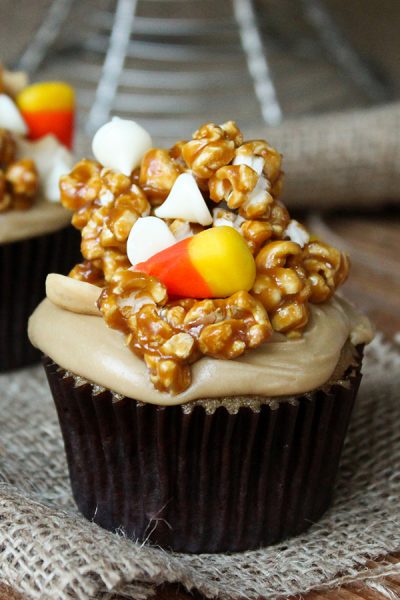
Caramel Corn Cupcakes - caramel cupcakes topped with caramel frosting and caramel popcorn studded with candy corn and cashews. A Halloween cupcake recipe by our contributor, Lauren Kapeluck of EllenJay Events. Happy Fall Y'all! I'm thrilled to be back in full swing with baking and cupcakes after a few months away. Fall is one of my absolute favorite times to bake so I couldn't let another month go by without sharing a new recipe with you all! I hope you like CARAMEL because this ... Continue Reading
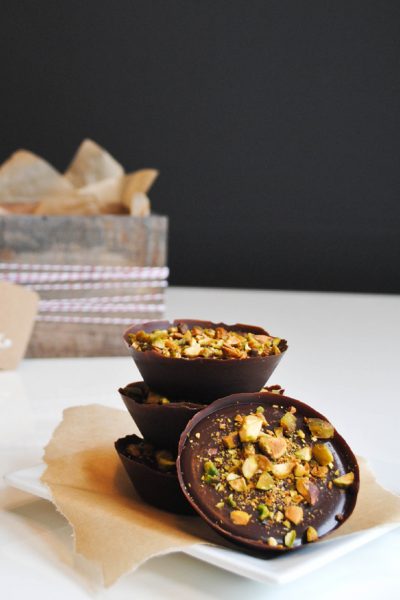
Godiva Truffle Flight & Cupcake Recipe
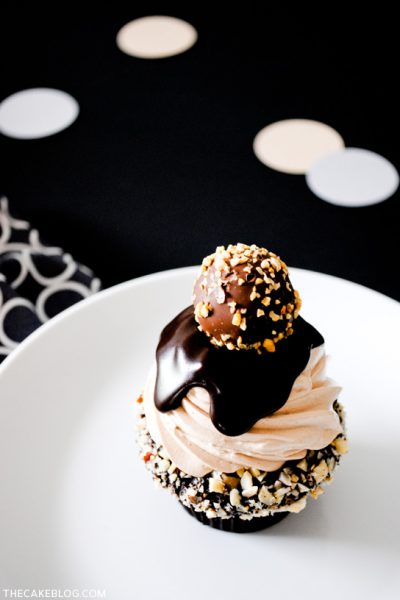
If you're like me, there is nothing more blissful than chocolate. Except maybe an evening filled with chocolate truffles, girlfriends and a glass of Prosecco! I've partnered up with Godiva to bring you inspiration for the ultimate girls' get together and a new cupcake recipe. It's a Girls' Flight Night featuring Godiva's new Truffle Flights. So it all starts with Godiva's new line of Truffle Flights. The concept is much like a flight of wine, except we're indulging in chocolate! A box of ... Continue Reading
White on White Ruffles

You know it's going to be good when the description starts with bright, white and pristine. Oh for the love of monochromatic beauty! Today's cake is an elegant design that's all about the white-on-white texture. Delicate ruffles flow up, down and all around creating swirls of dreamy detail. While clusters of petite pompoms add another layer of wow-inducing character. It's refined, elegant and just down right stunning. Let's swoon, shall we? It's an incredible White on White Ruffles Cake ... Continue Reading
Speckled Egg Cake
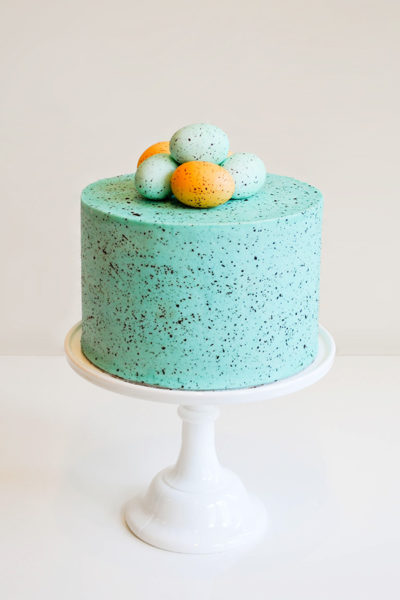
It might not feel like it, with cold air and snow still hanging around, but Spring is just around the corner. Before you know it, the first buds of green will be popping up on tree branches. Birds will be chirping. Flowers will be blooming. And Easter will be on the way! So today we're getting ready with a new cake tutorial that is all about Spring! Inspired by the gorgeous color and texture of robins' eggs, this cake is super easy and incredibly fun. And completely achievable for all ... Continue Reading
Champagne & Raspberry Cupcakes
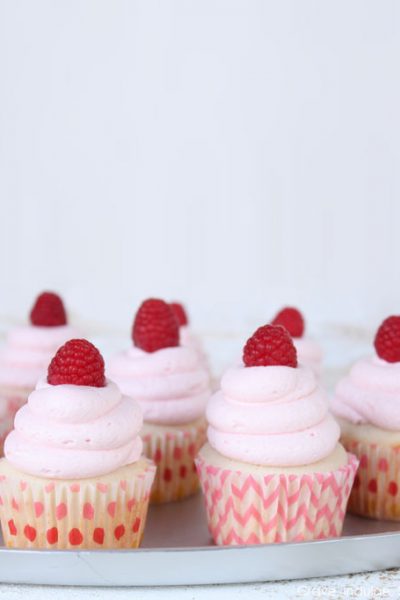
Champagne Raspberry Cupcakes - Bubbly champagne and raspberries come together in this delicious Valentine's Day cupcake, topped with raspberry buttercream frosting and fresh raspberries. A new cupcake recipe created by our contributor, Lauren Kapeluck of EllenJay Events. Valentine's Day is just around the corner, do you know what you are getting your sweetie this year? While the standard box of chocolates and a dozen roses are a nice gesture, I'm encouraging you to step outside the ... Continue Reading
Merry Christmas!
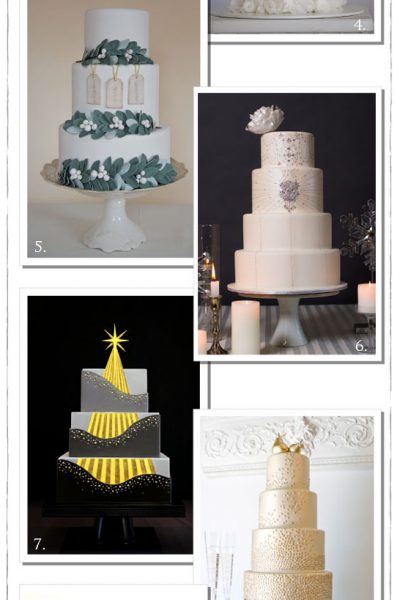
I am officially signing off for a few days to spend Christmas with my family. But before I go, I thought I’d leave you with a quick recap of our holiday cake series…. it’s been a busy month of beautiful Christmas inspiration here on The Cake Blog. Created by some of today's top bakers, especially to inspire you! As I went through all twelve cakes again, I just had to stop for a moment. I am in awe of the immense talent showcased in these twelve cakes. It is remarkable to see how each of ... Continue Reading
Holiday Cookie Exchange
With the hustle and bustle of the holiday season, it's nice to slow down for a moment and do something special for your friends and loved ones. One of the most classic ways to show we care is to give the gift of baked goods! Because really, who doesn't appreciate a sweet homemade treat? So today some of my blogging and baking friends are swapping cookies... virtually! And can you guess the best part? You'll enjoy six new recipes to add to your holiday baking list. Plus some creative ... Continue Reading
Pumpkin Spice Latte Cake
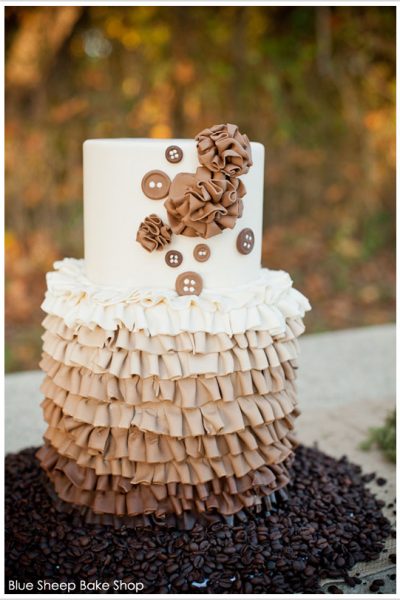
How do you know when the holidays are upon us? The change in temperature outside? The hustle and bustle? Or the pumpkin spice lattes popping up at all of your favorite coffee shops?! Today's cake celebrates the feeling of fall with it's seasonal latte-inspired goodness! Layers upon layers of ruffles fade from a deep espresso to a creamy ivory. Surrounded by an abundance of beans and oodles of autumn pretties, this entire table has me craving coffee and cake! What a perfect way start to ... Continue Reading
Pixie Hollow Birthday Party
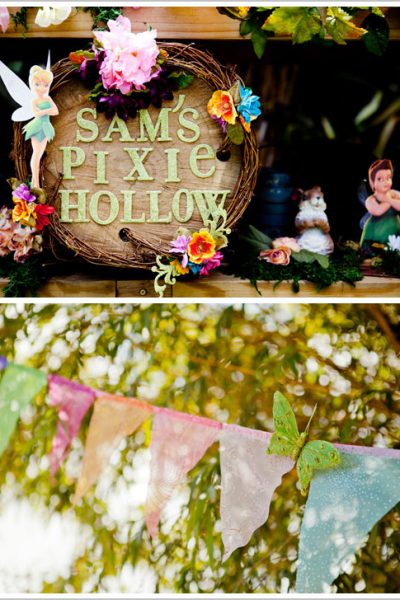
It's Friday and we're wrapping up the week with an event full of whimsical fun! Today we're going to spread our wings and fly... straight into Pixie Hollow. Tinker Bell and her friends have gathered for a birthday celebration! Maylene of Malu Boutiques took her daughter's love of Tinker Bell and brought this magical land of fairies to life. Join us as we explore the beautiful meadows filled with flowers, sweet treats and fluttering fairies... it's a Pixie Hollow Birthday Party! Tree ... Continue Reading
