Happy New Year! I know, I know. The new year started weeks ago and here I am, more than a little late to 2019. I hope you had a wonderful holiday season and are ready to kick off another new year. Personally I like to start each year with a little reflection and some goal setting. Even though it sounds cliché, this is something I’ve been doing for years now so it seems very natural to me, but I completely get it's not for everyone. I think the start of each new year is a great time to refocus on ... Continue Reading
Search Results for: blueberries
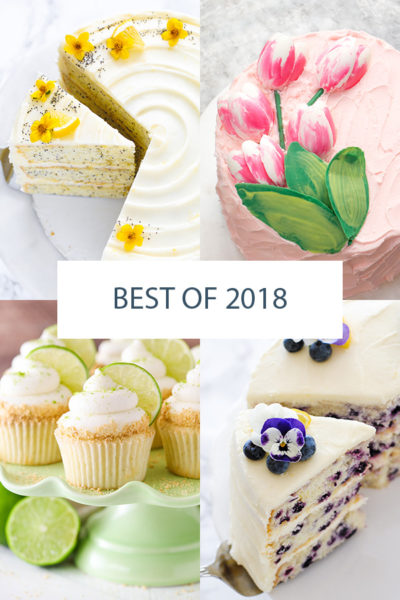
Best of 2017

We're taking a moment to reflect back on the best of 2017. Plus we want to hear from YOU as we plan for 2018! Happy New Year! I can hardly believe what I’m about to type… but 2018 is here! I hope you had a wonderful holiday season and are ready to kick off another new year. Personally I like to start each year with a little reflection and some goal setting. Even though it sounds cliché, this is something I've been doing for more than 15 years now so it seems very natural to me, but I ... Continue Reading
10 Strawberry Desserts to Bake
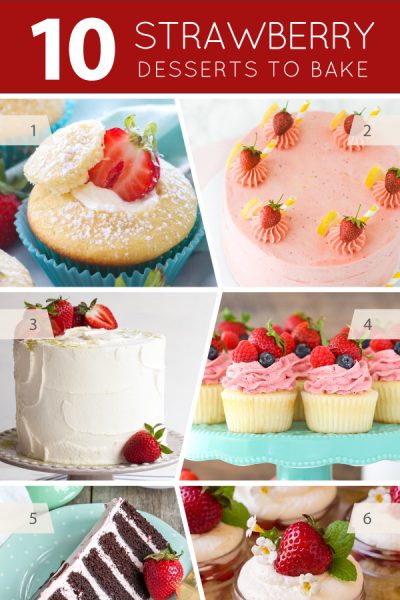
If you've been counting down the days until local strawberries start to arrive in your market, your wait is over. Berry season is finally here! We kicked the season off with our third annual strawberry picking trip and now I simply can't shake the pink-hued strawberry dreams that keep popping to mind. Now is the time to overindulge in baskets upon baskets of fresh strawberries. Red, delicious and ripe - in season strawberries just taste like summer. Their sweet yet tart bite conjures up ... Continue Reading
Strawberry Lemonade Cake
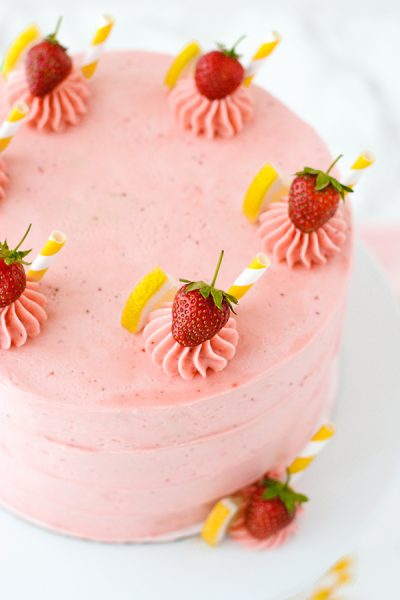
Strawberry Lemonade Cake. A tender layer cake recipe brightened with lemon juice, lemon zest and fresh strawberries, frosted with a tangy sweet fresh strawberry buttercream frosting. Last summer I shared my favorite Lemon Blueberry Cake and while it's always been a hit in our house, it quickly became a reader favorite too. So many of you have given it a try and left your feedback. Thank you! Turns out, one of the most commonly asked questions on this recipe is about subbing ... Continue Reading
Fourth of July
EATON MESS CAKE BERRIES AND CREAM CUPCAKES FIREWORKS CAKE RED WHITE & BLUE DESSERTS LEMON BLUEBERRY CAKE PATRIOTIC PINWHEELS STRAWBERRY SWIRL CAKE CHEESECAKE SHOTS STRAWBERRY PICKING VINTAGE PATRIOTIC CAKE LEMON BLUEBERRY CUPCAKES PINWHEEL COOKIES COOKIE DOUGH ICE CREAM SAMMY STRAWBERRY THYME CAKE AMERICANA QUILT CAKE RED WHITE & BLUE STRAWBERRY MATCHA CAKE ROASTED BLUEBERRY ... Continue Reading
Summer Gallery

TEQUILA SUNRISE CUPCAKES FLAMINGO CAKE LEMON BLUEBERRY CAKE STRAWBERRY LEMONADE CAKE S'MORES CAKE LEMON POPPY SEED CAKE KEY LIME CUPCAKES 10 FLAMINGO TREATS HONEY CUPCAKES GIANT DONUT CAKE CREME BRULEE CAKE FLAMINGO CAKE STRAWBERRY NUTELLA EATON MESS CAKE 10 SUMMER CUPCAKES CHERRY CHIP CAKE 10 ICE CREAM CAKES LEMON BLUEBERRY CUPCAKES LEMON LAVENDER ... Continue Reading
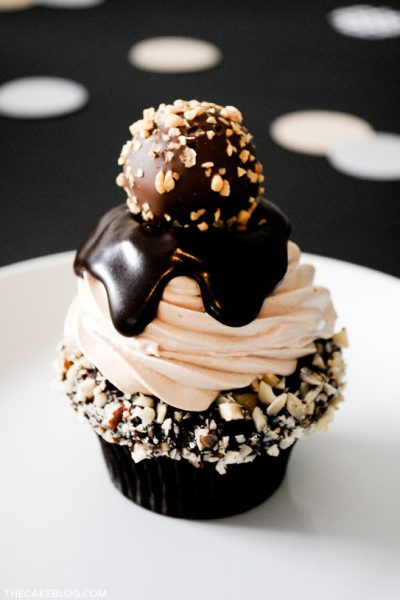
Berries and Cream Cupcakes
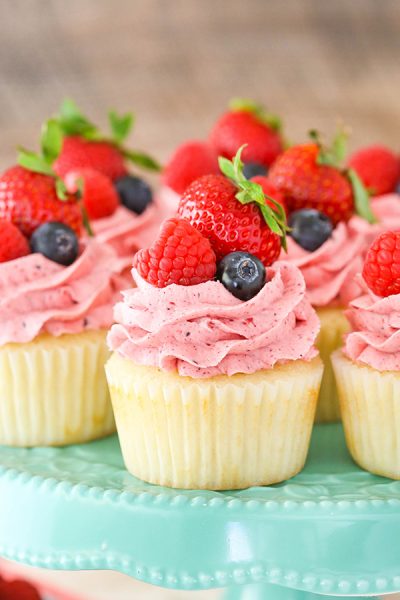
Berries and Cream Cupcakes - mixed berry buttercream paired with a moist vanilla cupcake stuffed with whipped cream cheese filling, topped with fresh strawberries, raspberries and blueberries. A new cupcake recipe by our contributor, Lindsay Conchar. Berries have always been my favorite of the fruits. Strawberries, in particular. I remember back in college, my husband (then boyfriend) and I would always look forward to visiting his family on the coast of North Carolina in May. School ... Continue Reading
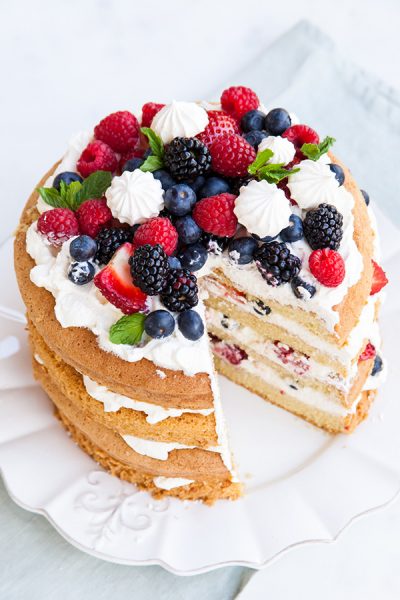
10 Fresh Berry Layer Cakes
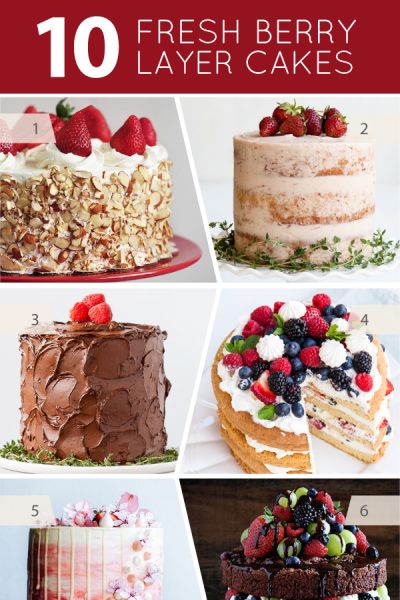
When local berries are in season, there is nothing that can compete. Fresh, juicy and sweet with just the right amount of contrasting tartness and an aroma that is out of this world. For us, it's a glorious string of abundance from April to September. While off-season berries do their best to fill the void over the fall and winter months, what they're lacking in flavor is only exasperated by their hefty price tag. So before we wave goodbye to yet another berry season, let's bake something ... Continue Reading
Lemon Blueberry Cake

Lemon Blueberry Cake. A tender layer cake recipe brightened with lemon juice, lemon zest and wild blueberries, frosted with a tangy sweet lemon cream cheese frosting. Today's cake is tart yet sweet and perfect for summer. A tender butter cake is brightened with a hint of fresh lemon juice and flecks of lemon zest. Wild blueberries dancing throughout each layer give the cake a pop of contrast, both in appearance, texture and taste. Then comes the dreamy cream cheese frosting that boasts ... Continue Reading
Easter Gallery
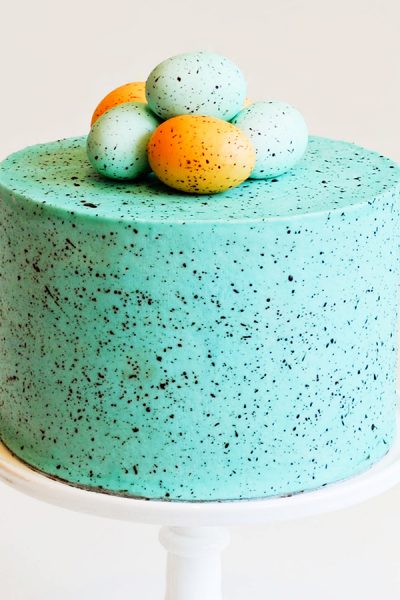
SPECKLED EGG CAKE SPRING WREATH CAKE EASTER EGG CAKES CHOCOLATE DAFFODILS LEMON BLUEBERRY CAKE RAINBOW MOSAIC CAKE EASTER BUNNY CUPCAKES FLOWER SUGAR COOKIES BLACKBERRY LIME CAKE CHOCOLATE BUNNY CAKE BUNNY FACE COOKIES MARBLED CHOCOLATE EGGS LEMON POPPY SEED CAKE CHOCOLATE TULIPS CHOCOLATE FLOWER CAKE GARDEN CUPCAKES COOKIE MOSS CAKE LEMON HONEY CAKE EASTER BASKET ... Continue Reading
Blueberry Yogurt Parfaits
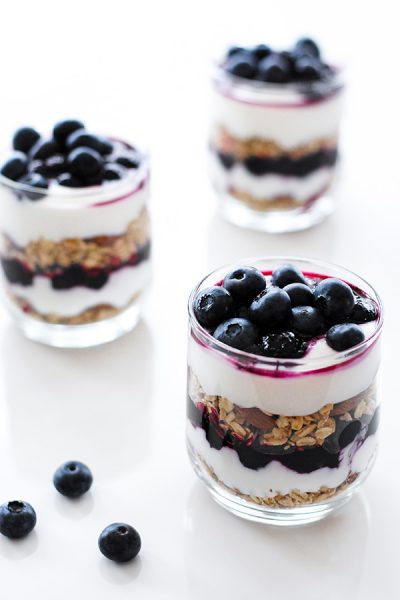
Upgrade your morning routine with a breakfast parfait that packs a nutritious punch. I've partnered up with Yulu Yogurt to bring you today's tasty recipe! June is here and we're basking in the fresh fruit aisle as summer's best berries are ripe and ready for eating. With baskets of plump blueberries in hand, now is the time to break free from the same old breakfast routine. In our house, it's a constant struggle to balance healthy and nutritious with delicious. But the search for a tasty ... Continue Reading
Top Recipes of 2013
Happy New Year! I can hardly believe what I'm about to type... but 2014 is here! It's time to kick off another new year of cake inspiration and, as always, the months ahead are full of fabulous things to come. While I'm anxious to see everything that 2014 has in store, I'm not quite ready to say goodbye to last year. The past twelve months were filled to the brim with new recipes, DIY's and tutorials, new cake designs and dessert tables. And we simply can't let an incredible year like 2013 ... Continue Reading
Recipe: Blackberry Cobbler Cupcakes
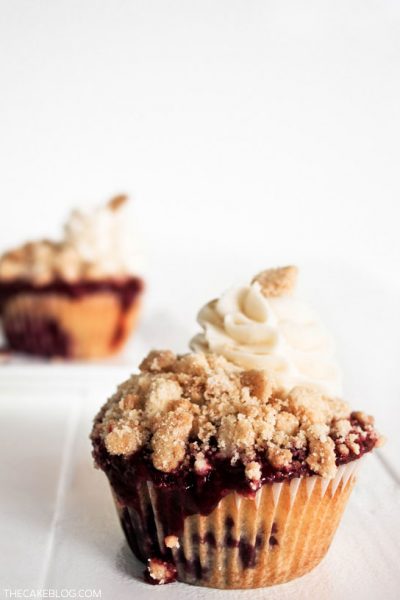
I've never met a fresh berry that I didn't like. Strawberries, raspberries, blueberries, blackberries. You name it, I'm in. Deliciously sweet on their own or jazzed up with a little hint of sugar and mint. OR... baked up into a hot, bubbly, berry cobbler... now we're really talking berries! I have fond childhood memories of my mom's blackberry cobbler. A cobbler that started with wild blackberries, picked in a local field. Which honestly, is a concept I can't even imagine now as an ... Continue Reading
Lemon Blueberry Cupcakes
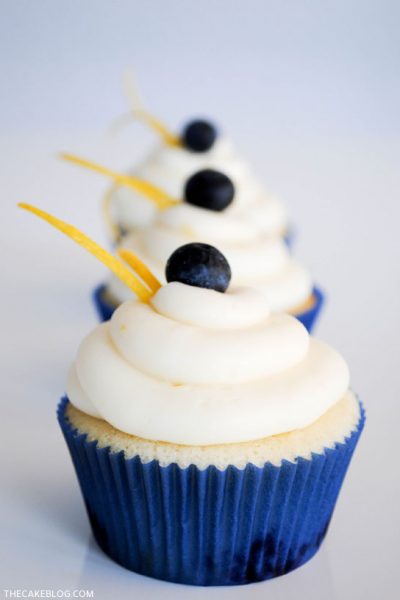
Lemon Blueberry Cupcakes. Bright lemon cupcakes with fresh blueberries topped with lemon cream cheese frosting. Garnished with lemon zest and more blueberries. Blueberries and lemons are a match that was simply meant to be. This fresh blueberry-studded cupcake is infused with lemon zest and topped with a tangy lemon cream cheese frosting, creating a flavor combination that is refreshing, bright and incredibly tempting. So tempting that you might have a hard time resisting these Lemon ... Continue Reading
Red, White & Blue Desserts
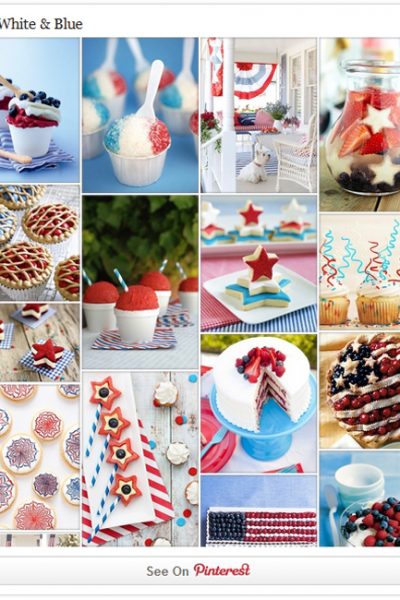
With the Memorial Day weekend upon us, I thought we'd have a little red, white and blue fun today. We're taking a look at some of my favorite patriotic ideas from the blog and around the web. So in an effort to get to this holiday weekend started NOW... let's dive right in to the sweet stuff! 1. Make these easy Mini Cheesecake Shooters topped with puff pastry stars. Recipe HERE. 2. Learn to make fondant pinwheel cupcake toppers with patriotic flair. Photo tutorial HERE. 3. ... Continue Reading
Blueberry Breakfast Cake
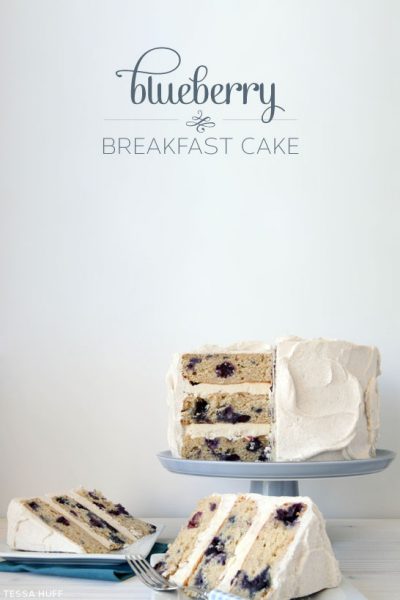
Our contributor, Tessa Huff, is back with another tempting cake recipe.... Spring is the season for brunching. Good friends, daffodils, pastries, and mimosas- there is no better way to celebrate renewal, bright blooms, and warmer weather. Amongst the danishes, donuts, and other sweet treats, cake does not seem to make many appearances on the brunch menu. But what not bring cake to the breakfast party? Coming from someone who believes a nice layer cake is appropriate for all occasions, ... Continue Reading
Blueberry Rainbow Cake
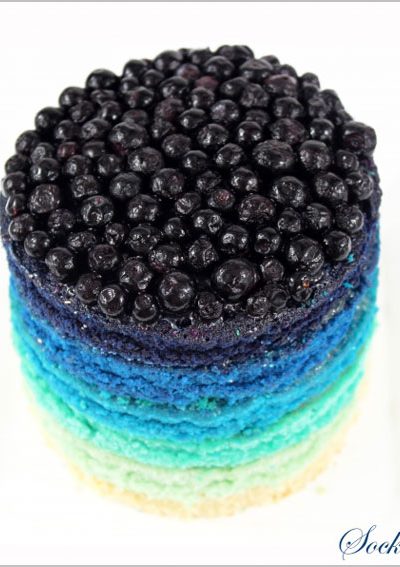
Summer might be coming to a close but there's still time to enjoy the fresh berries that the season has to offer! Today's cake is a great way to do just that. It's a fresh and vibrant take on the oh-so-popular rainbow cakes! Shaded blue, filled with lemon curd and topped with berries, this cake is the perfect combination of blueberry and lemon. A treat for both your eyes and your mouth, check out this Blueberry Rainbow Cake created by Lisa Lundqvist of Sockerrus (a Swedish blog named Sugar ... Continue Reading
Patriotic Puff Pastry Stars
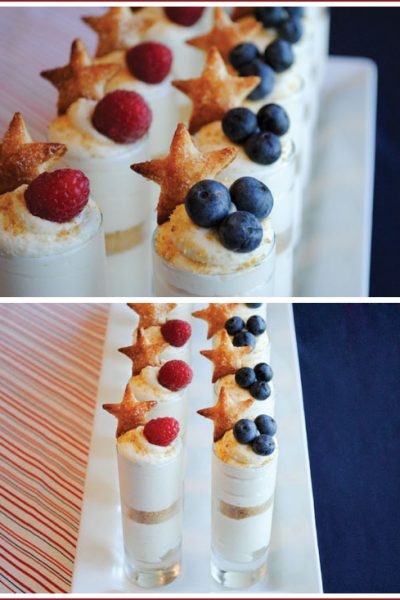
This weekend is the 4th of July and here at Half Baked, we're ready to go! You may have spotted our Stars & Stripes Cheesecake Shots over at Hostess with the Mostess. (Yay! Thanks for the feature Jenn!) I created this cheesecake shot recipe for the Milkaholic Baby Shower that I hosted a few months ago and was thrilled to recreate these treats with a patriotic twist. Cold shot glasses filled with creamy cheesecake filling, graham cracker crumbs and topped with berries. To give it an extra ... Continue Reading
